
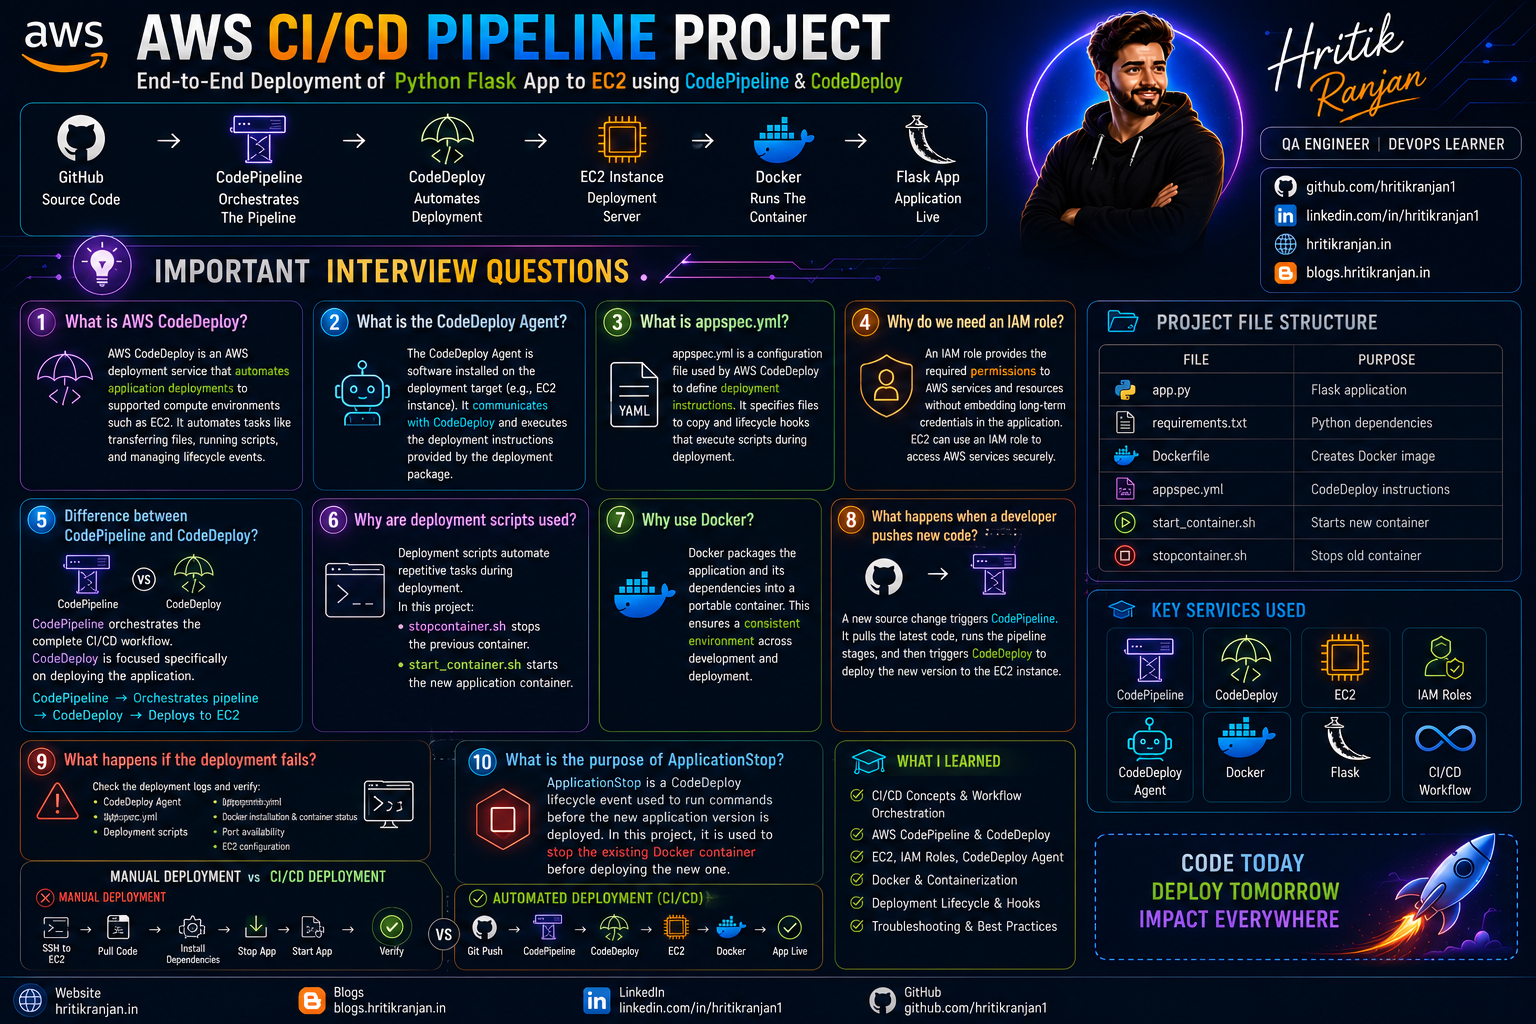
🚀 AWS CI/CD Pipeline | End-to-End Deployment Using CodePipeline & CodeDeploy
Build an automated deployment pipeline for a Dockerized Python Flask application using GitHub, AWS CodePipeline, AWS CodeDeploy, and EC2.

In this project, we will build an end-to-end CI/CD pipeline on AWS that automatically deploys a Python Flask application to an EC2 instance.
The project focuses mainly on the Continuous Delivery (CD) part of the pipeline using AWS CodeDeploy and then integrates CodeDeploy with AWS CodePipeline.
By the end of this project, the workflow will look like:
Developer
   │
   │ git push
   ▼
GitHub Repository
   │
   ▼
AWS CodePipeline
   │
   ▼
Source Stage
   │
   ▼
Build / CI Stage
   │
   ▼
AWS CodeDeploy
   │
   ▼
EC2 Instance
   │
   ├── CodeDeploy Agent
   ├── Docker
   └── Flask Application

📚 Table of Contents

🎯 What We Are Building
Our goal is to deploy a Python Flask application running inside a Docker container onto an AWS EC2 instance.
Instead of manually connecting to the EC2 server every time we release a new version, we want AWS to automatically deploy the latest version.
The final workflow will be:
Developer pushes code
        ↓
GitHub
        ↓
CodePipeline
        ↓
CodeDeploy
        ↓
EC2
        ↓
Docker Container
        ↓
Flask Application
This means whenever new code is pushed into the configured repository, the pipeline can automatically take that code through the required stages and deploy it to the EC2 server.
🤔 What is CI/CD?
CI/CD stands for:
CI → Continuous Integration
CD → Continuous Delivery / Continuous Deployment
CI/CD is a software development approach that automates the process of:
Code → Build → Test → Package → Deploy
Without CI/CD, developers may have to manually build applications, copy files to servers, restart applications, and verify deployments.
With CI/CD, these activities can be automated.
🔄 CI vs CD
Continuous Integration — CI
Continuous Integration focuses on automatically validating new code changes.
For example:
Developer
   ↓
Git Push
   ↓
Build
   ↓
Unit Tests
   ↓
Package
The objective is to identify problems early.
Continuous Delivery — CD
Continuous Delivery focuses on taking successfully built application code and deploying it to an environment.
For example:
Build Artifact
     ↓
CodeDeploy
     ↓
EC2
     ↓
Application
In this project, AWS CodeDeploy is responsible for the deployment process.
☁️ AWS Services Used
We will use the following components:
| Service | Purpose |
|---|---|
| GitHub | Source code repository |
| AWS CodePipeline | Orchestrates the pipeline |
| AWS CodeDeploy | Automates deployment |
| Amazon EC2 | Deployment server |
| IAM | Permissions and access control |
| Docker | Runs the application container |
| Python Flask | Sample application |

🏗️ Project Architecture
The high-level architecture looks like this:
                    ┌──────────────────┐
                    │     Developer    │
                    └────────┬─────────┘
                             │
                          git push
                             │
                             ▼
                    ┌──────────────────┐
                    │      GitHub      │
                    │   Source Code    │
                    └────────┬─────────┘
                             │
                             ▼
                    ┌──────────────────┐
                    │  CodePipeline    │
                    └────────┬─────────┘
                             │
                             ▼
                    ┌──────────────────┐
                    │   CodeDeploy     │
                    └────────┬─────────┘
                             │
                             ▼
              ┌──────────────────────────────┐
              │          EC2 Instance        │
              │                              │
              │   CodeDeploy Agent           │
              │   Docker                     │
              │                              │
              │       Docker Container       │
              │              │               │
              │              ▼               │
              │       Python Flask App       │
              └──────────────────────────────┘
🧰 Prerequisites
Before starting this project, you should have basic knowledge of:
AWS
EC2
IAM
Git/GitHub
Linux
Docker
Basic Python
Basic CI/CD concepts
You should also have:
An AWS account
A GitHub repository
A sample Flask application
An EC2 instance
Permission to create IAM roles and AWS services

📁 Step 1: Prepare the Application
First, we need an application that will be deployed.
For this project, we are using a Python Flask application.
A simple project structure can look like:
project/
│
├── app.py
├── Dockerfile
├── appspec.yml
├── start_container.sh
├── stopcontainer.sh
└── requirements.txt
Let's understand these files.
app.py
This contains our Flask application.
Example:
from flask import Flask

app = Flask(__name__)

@app.route("/")
def home():
    return "Hello from AWS CI/CD Pipeline!"

if __name__ == "__main__":
    app.run(host="0.0.0.0", port=5000)
The application listens on port 5000 inside the container.
🐳 Dockerfile
We use Docker to package our application and its dependencies.
Example:
FROM python:3.10

WORKDIR /app

COPY requirements.txt .

RUN pip install -r requirements.txt

COPY . .

EXPOSE 5000

CMD ["python", "app.py"]
The Dockerfile tells Docker how to create the application image.
📦 requirements.txt
This file contains the Python dependencies.
For example:
Flask
📜 Step 2: Understand appspec.yml
One of the most important files in AWS CodeDeploy is:
appspec.yml
The appspec.yml file tells CodeDeploy how the application should be deployed.
It defines deployment instructions and lifecycle hooks.
A simplified example can look like:
version: 0.0

os: linux

files:
  - source: /
    destination: /home/ubuntu/app

hooks:
  ApplicationStop:
    - location: stopcontainer.sh
      timeout: 300
      runas: root

  ApplicationStart:
    - location: start_container.sh
      timeout: 300
      runas: root
The exact configuration can vary depending on the application and deployment design.
🔄 CodeDeploy Lifecycle
CodeDeploy provides lifecycle events that allow us to execute scripts during deployment.
For example:
ApplicationStop
      ↓
Download / Install Files
      ↓
ApplicationStart
      ↓
Application Running
This is useful because we can automatically:
Stop the old container
Copy the new application files
Build/start the new container
Start the updated application
🛑 stopcontainer.sh
The purpose of this script is to stop the currently running application container before deploying the new version.
Example:
#!/bin/bash

docker stop flask-app || true
docker rm flask-app || true
The || true prevents the deployment from failing if the container does not already exist.
▶️ start_container.sh
This script starts the new application.
For example:
#!/bin/bash

cd /home/ubuntu/app

docker build -t flask-app .

docker run -d \
  --name flask-app \
  -p 80:5000 \
  flask-app
Now the application running on container port 5000 is exposed through EC2 port 80.
🖥️ Step 3: Create the EC2 Instance
Now we need an EC2 instance that will act as our deployment target.
From the AWS Console:
AWS Console
    ↓
EC2
    ↓
Launch Instance
Select an Ubuntu AMI.
For learning purposes, choose an appropriate small instance type that fits your AWS account and budget.
🔐 Configure Security Group
We need to allow the traffic required to access our server.
Typical rules could include:
| Protocol | Port | Purpose |
|---|---|---|
| SSH | 22 | Remote administration |
| HTTP | 80 | Application access |
For SSH, restrict the source to your own IP whenever possible.
Avoid opening administrative ports such as SSH to the entire internet unless there is a specific reason.
🔑 Connect to EC2
After launching the instance, connect using SSH.
Example:
ssh -i my-key.pem ubuntu@<EC2_PUBLIC_IP>
Make sure the private key has appropriate permissions:
chmod 600 my-key.pem

🐳 Step 4: Install Docker
Our application will run inside a Docker container, so Docker must be available on the EC2 instance.
First update the system:
sudo apt update
Then install Docker:
sudo apt install docker.io -y
Check the installation:
docker --version
Also verify that Docker is running:
sudo systemctl status docker
🤖 Step 5: Install CodeDeploy Agent
The CodeDeploy Agent is a software component installed on the deployment target.
It allows AWS CodeDeploy to communicate with the EC2 instance and execute deployment instructions.
The basic flow is:
AWS CodeDeploy
       ↓
CodeDeploy Agent
       ↓
EC2 Instance
       ↓
Application Deployment
The agent must be installed and running on the target EC2 instance.
After installation, verify its status using the appropriate service command for your system.
For example:
sudo systemctl status codedeploy-agent
If the service is running, the EC2 instance can communicate with CodeDeploy.
🔐 Step 6: Create IAM Role
IAM is extremely important in AWS CI/CD.
AWS services need permission to interact with other AWS resources.
For example:
CodeDeploy
    ↓
Needs permission
    ↓
EC2
An IAM role can provide the required permissions.
👤 EC2 IAM Role
The EC2 instance should have an IAM role that provides the permissions required by the CodeDeploy agent and application.
When configuring the role, follow the principle of least privilege.
That means:
Give only the permissions that are actually required.
Avoid giving broad administrator permissions unnecessarily.

🚀 Step 7: Create CodeDeploy Application
Now let's create an AWS CodeDeploy application.
Go to:
AWS Console
     ↓
CodeDeploy
     ↓
Applications
     ↓
Create application
Choose:
Compute Platform: EC2/On-premises
Give the application a meaningful name.
For example:
flask-cicd-app
👥 Step 8: Create Deployment Group
After creating the CodeDeploy application, create a Deployment Group.
The deployment group tells CodeDeploy:
"Which EC2 instances should receive this deployment?"
We can identify instances using tags.
For example:
Key: Environment
Value: Production
Then CodeDeploy can deploy to EC2 instances matching that tag.
🏷️ Why Use EC2 Tags?
Tags help AWS identify and organize resources.
For example:
Environment = Production
Application = Flask
Team = DevOps
CodeDeploy can use these tags to select deployment targets.
📦 Step 9: Create Deployment
Now our application repository should contain the required deployment files:
app.py
Dockerfile
requirements.txt
appspec.yml
start_container.sh
stopcontainer.sh
The source package is provided to CodeDeploy.
CodeDeploy reads:
appspec.yml
and follows the deployment instructions.
🔄 Deployment Flow
The deployment process looks like:
Source Package
      ↓
CodeDeploy
      ↓
ApplicationStop
      ↓
Files Copied
      ↓
ApplicationStart
      ↓
Docker Image Built
      ↓
Docker Container Started
      ↓
Application Available
🔗 Step 10: Integrate CodeDeploy with CodePipeline
Now we connect CodeDeploy with AWS CodePipeline.
This is where our project becomes an end-to-end automated pipeline.
The pipeline can be represented as:
GitHub
   ↓
CodePipeline
   ↓
Source
   ↓
Build / CI
   ↓
CodeDeploy
   ↓
EC2
   ↓
Docker
   ↓
Flask Application
CodePipeline acts as the orchestrator.
It coordinates the different stages of the software delivery process.
🏗️ Create the CodePipeline
Go to:
AWS Console
      ↓
CodePipeline
      ↓
Create Pipeline
Give the pipeline a meaningful name.
Example:
flask-cicd-pipeline
📥 Source Stage
Configure GitHub as the source provider.
The pipeline will retrieve the latest application code from the configured repository.
Whenever the source changes according to the configured trigger, the pipeline can start a new execution.
🔨 Build Stage
If your project already has a CI/build stage, CodePipeline can pass the resulting application package to the deployment stage.
The important idea is:
Source
   ↓
Build
   ↓
Deployment
Only after the required previous stage succeeds should the deployment stage proceed.
🚀 Deployment Stage
For the deployment stage, select:
Provider:
AWS CodeDeploy
Then select:
Application
Deployment Group
that you created earlier.
Now CodePipeline knows where to send the application.
🎯 Complete Pipeline
Our final pipeline looks like:
┌──────────────┐
│    GitHub    │
└──────┬───────┘
       │
       ▼
┌──────────────┐
│ CodePipeline │
└──────┬───────┘
       │
       ▼
┌──────────────┐
│    Source    │
└──────┬───────┘
       │
       ▼
┌──────────────┐
│     Build    │
└──────┬───────┘
       │
       ▼
┌──────────────┐
│  CodeDeploy  │
└──────┬───────┘
       │
       ▼
┌─────────────────────┐
│     EC2 Instance    │
│                     │
│  CodeDeploy Agent   │
│        ↓            │
│      Docker         │
│        ↓            │
│  Flask Container    │
└─────────────────────┘
🧪 Step 11: Test the Complete Pipeline
Now let's test the pipeline.
Make a small change to your application.
For example:
return "Hello from AWS CI/CD Pipeline - Version 2!"
Commit the change:
git add .
git commit -m "Update application"
git push
The pipeline should detect the new source version according to its configured trigger.
Then:
GitHub
   ↓
CodePipeline
   ↓
CodeDeploy
   ↓
EC2
   ↓
Docker
   ↓
New Application Version

🌐 Verify the Application
Once deployment succeeds, access the EC2 instance using the configured application endpoint.
If the application is exposed on port 80, you can access:
http://<EC2_PUBLIC_IP>
If everything is configured correctly, the updated Flask application should be displayed.
🔍 How Does CodeDeploy Know What to Do?
This is one of the most important beginner questions.
CodeDeploy uses:
appspec.yml
The file defines:
Which files should be deployed
Where they should be copied
Which lifecycle scripts should run
When those scripts should run
For example:
ApplicationStop
       ↓
Stop old application
       ↓
Deploy files
       ↓
ApplicationStart
       ↓
Start new application
🛠️ Common Problems & Troubleshooting
During real deployments, things don't always work on the first attempt.
Here are some common problems highlighted by this project.
❌ 1. CodeDeploy Agent Not Running
Check:
sudo systemctl status codedeploy-agent
If it is stopped, start it using the appropriate system service command.
The CodeDeploy agent must be healthy for deployments to work.
❌ 2. Docker Is Not Installed
If your deployment script executes:
docker build
but Docker is not installed, the deployment will fail.
Check:
docker --version
Install Docker if necessary.
❌ 3. Docker Permission Issues
The deployment user may not have permission to communicate with Docker.
Check Docker permissions and ensure the deployment scripts execute with the appropriate user privileges.
❌ 4. Port Already in Use
Suppose your container uses:
-p 80:5000
but another process is already using port 80.
The new container may fail to start.
Check listening ports:
sudo ss -tulpn
You can then identify which process is using the required port.
❌ 5. Old Container Is Still Running
If the previous container is still running, the new container may fail because of:
Container name conflict
or:
Port already allocated
That's why the stop script is important.
Example:
docker stop flask-app || true
docker rm flask-app || true
❌ 6. Incorrect appspec.yml
A small mistake in:
appspec.yml
can cause deployment failure.
Check:
File name
YAML indentation
Script paths
Destination directories
Lifecycle hook names
File permissions
❌ 7. IAM Permission Problems
AWS services need appropriate permissions.
If the required IAM role does not have sufficient permissions, deployment operations can fail.
Always check:
IAM Role
   ↓
Required Permissions
   ↓
AWS Service Access
📂 Important Project Files
A useful project structure is:
flask-cicd-project/
│
├── app.py
│
├── requirements.txt
│
├── Dockerfile
│
├── appspec.yml
│
├── start_container.sh
│
└── stopcontainer.sh
Each file has a specific responsibility.
| File | Purpose |
|---|---|
app.py |
Flask application |
requirements.txt |
Python dependencies |
Dockerfile |
Creates Docker image |
appspec.yml |
CodeDeploy deployment instructions |
start_container.sh |
Starts new container |
stopcontainer.sh |
Stops old container |

🧠 Key Concepts
1. AWS CodeDeploy
CodeDeploy automates application deployments to supported compute environments such as EC2.
It removes much of the manual work involved in copying application files and executing deployment scripts.
2. CodeDeploy Agent
The CodeDeploy Agent runs on the deployment target.
It communicates with AWS CodeDeploy and executes the deployment instructions.
3. appspec.yml
This is the deployment configuration file.
It defines:
Files
Hooks
Lifecycle Events
Deployment Instructions
4. Lifecycle Hooks
Lifecycle hooks allow scripts to execute at specific stages of deployment.
Examples include:
ApplicationStop
ApplicationStart
5. CodePipeline
CodePipeline orchestrates the different stages of the CI/CD workflow.
For example:
Source
  ↓
Build
  ↓
Deploy
6. IAM Role
IAM roles provide AWS resources and services with the permissions they need.
They are preferable to embedding long-term AWS credentials inside application code or deployment scripts.
7. EC2
Amazon EC2 provides the virtual server where our application is ultimately deployed.
8. Docker
Docker packages the Flask application and its dependencies into a container.
This makes the application environment more consistent.
🔥 Why Use Docker in This Project?
Without Docker, we might need to manually configure:
Python
Flask
Dependencies
System Libraries
Application Configuration
With Docker, we package the environment into an image.
Dockerfile
    ↓
Docker Image
    ↓
Docker Container
    ↓
Flask Application
This provides a more consistent deployment process.
🔄 Manual Deployment vs CI/CD Deployment
❌ Traditional Manual Deployment
Developer
    ↓
SSH into EC2
    ↓
Pull latest code
    ↓
Install dependencies
    ↓
Stop application
    ↓
Start application
    ↓
Verify
This process is repetitive and error-prone.
✅ Automated Deployment
Developer
    ↓
Git Push
    ↓
CodePipeline
    ↓
CodeDeploy
    ↓
EC2
    ↓
Docker
    ↓
Application
This is faster, repeatable, and easier to standardize.
🎯 What I Learned From This Project
This project helped me understand how different AWS services work together to create a practical CI/CD pipeline.
The major concepts covered were:
AWS CodePipeline
AWS CodeDeploy
EC2
IAM Roles
CodeDeploy Agent
Docker
Flask
appspec.ymlDeployment lifecycle hooks
Shell scripts
Automated deployments
CI/CD workflow
Deployment troubleshooting
💡 Important Interview Questions
Q1. What is AWS CodeDeploy?
Answer:
AWS CodeDeploy is an AWS deployment service that automates application deployments to supported compute environments such as EC2.
It helps automate tasks such as transferring application files, executing deployment scripts, and managing application lifecycle events.
Q2. What is the CodeDeploy Agent?
Answer:
The CodeDeploy Agent is software installed on the deployment target, such as an EC2 instance.
It communicates with CodeDeploy and executes the deployment instructions provided by the deployment package.
Q3. What is appspec.yml?
Answer:
appspec.yml is a configuration file used by AWS CodeDeploy to define deployment instructions.
It can specify files to copy and lifecycle hooks that execute scripts during deployment.
Q4. Why do we need an IAM role?
Answer:
An IAM role provides the required permissions to AWS services and resources without embedding long-term credentials directly into the application.
For example, an EC2 instance can use an IAM role to access AWS services securely.
Q5. What is the difference between CodePipeline and CodeDeploy?
Answer:
CodePipeline is used to orchestrate the complete CI/CD workflow.
CodeDeploy is focused specifically on application deployment.
For example:
CodePipeline
    ↓
Orchestrates pipeline
    ↓
CodeDeploy
    ↓
Deploys application to EC2
Q6. Why are deployment scripts used?
Answer:
Deployment scripts automate repetitive deployment tasks.
In this project:
stopcontainer.sh
stops the previous container, while:
start_container.sh
starts the new application container.
Q7. Why use Docker?
Answer:
Docker packages the application and its dependencies into a portable container.
This helps create a consistent application environment between development and deployment.
Q8. What happens when a developer pushes new code?
Answer:
In our configured pipeline, a new source change can trigger CodePipeline.
The pipeline retrieves the updated code, processes the configured stages, and then invokes CodeDeploy to deploy the new version to the EC2 instance.
Q9. What happens if the deployment fails?
Answer:
We should check the deployment status and logs, then verify:
CodeDeploy Agent
IAM permissions
appspec.ymlDeployment scripts
Docker installation
Docker container status
Port availability
EC2 configuration
Q10. What is the purpose of ApplicationStop?
Answer:
ApplicationStop is a CodeDeploy lifecycle event that can be used to execute commands before the new application version is deployed.
In this project, it can be used to stop the existing Docker container.
🚀 Final Architecture
After completing this project, our application delivery architecture looks like:
                         DEVELOPER
                             │
                             │ git push
                             ▼
                    ┌─────────────────┐
                    │     GitHub      │
                    └────────┬────────┘
                             │
                             ▼
                    ┌─────────────────┐
                    │  CodePipeline   │
                    └────────┬────────┘
                             │
                       Source / Build
                             │
                             ▼
                    ┌─────────────────┐
                    │   CodeDeploy    │
                    └────────┬────────┘
                             │
                             ▼
              ┌─────────────────────────────┐
              │          EC2 Server         │
              │                             │
              │   CodeDeploy Agent          │
              │          │                  │
              │          ▼                  │
              │        Docker               │
              │          │                  │
              │          ▼                  │
              │   Flask Container           │
              │          │                  │
              │          ▼                  │
              │    Flask Application        │
              └─────────────────────────────┘
📝 Key Takeaways
The most important thing to understand from this project is not just how to click through the AWS Console.
The important concept is understanding how the services communicate with each other.
GitHub
  ↓
CodePipeline
  ↓
CodeDeploy
  ↓
CodeDeploy Agent
  ↓
EC2
  ↓
Docker
  ↓
Flask Application
Each component has a specific responsibility.
GitHub → Stores source code
CodePipeline → Orchestrates the delivery workflow
CodeDeploy → Handles application deployment
CodeDeploy Agent → Communicates with the EC2 target
EC2 → Provides the server
Docker → Runs the application container
Flask → Provides the application
🏁 Conclusion
In this project, we implemented a practical AWS CI/CD deployment workflow using CodePipeline, CodeDeploy, EC2, IAM, Docker, and GitHub.
We started with a Python Flask application and prepared it for automated deployment using:
Dockerfile
appspec.yml
start_container.sh
stopcontainer.sh
We then configured an EC2 deployment target, installed the CodeDeploy Agent, configured IAM permissions, created a CodeDeploy application and deployment group, and finally integrated CodeDeploy with CodePipeline.
The final result is an automated deployment workflow:
Code Change
     ↓
GitHub
     ↓
CodePipeline
     ↓
CodeDeploy
     ↓
EC2
     ↓
Docker
     ↓
Updated Flask Application
This project provides a strong foundation for understanding how AWS-managed services can be combined to build a practical CI/CD workflow.
🚀 The real DevOps mindset is not just knowing individual tools — it is understanding how to connect those tools to build an automated, reliable, and repeatable software delivery process.
🔗 Reference
📺 AWS Ultimate CI/CD Pipeline | End-to-End Demo | AWS CodePipeline
https://youtu.be/8ftrKNbSv28?si=d0sHbYjlPyFtsQBT
🚀 Continue Your Learning Journey
Thank you for taking the time to read this article.
Technology is evolving rapidly, and continuous learning is one of the most valuable investments you can make in your career. Whether you're exploring DevOps, Cloud Computing, Artificial Intelligence, Cybersecurity, Software Development, Data Science, or Career Growth, the resources below can help you deepen your knowledge and stay ahead in the industry.
🎓 Recommended Learning Platforms
🚀 Coursera
Learn from world-renowned universities and industry leaders including Google, IBM, Stanford, Microsoft, Meta, and many more.
✔ Professional Certificates ✔ Career-focused Learning Paths ✔ AI & Machine Learning Programs ✔ Cloud & DevOps Certifications ✔ Business & Leadership Courses
🔗 https://imp.i384100.net/k0KvbV
💻 Udemy
One of the largest online learning platforms with practical, hands-on courses covering:
✔ DevOps & Kubernetes ✔ Docker & Cloud Computing ✔ AWS, Azure & GCP ✔ Programming & Development ✔ Cybersecurity & Ethical Hacking
🔗 https://trk.udemy.com/MAL2MY
📊 DataCamp
A great platform for anyone interested in:
✔ Python Programming ✔ SQL & Databases ✔ Data Analytics ✔ Machine Learning ✔ Artificial Intelligence
Interactive learning paths and hands-on projects make it ideal for beginners and professionals alike.
🔗 https://datacamp.pxf.io/nX4kER
🎓 edX
Access high-quality courses and certifications from leading institutions such as:
✔ Harvard University ✔ MIT ✔ Berkeley ✔ Microsoft
Perfect for learners seeking university-level education online.
🎨 Domestika
Enhance your creative skills with courses on:
✔ Graphic Design ✔ Video Editing ✔ Animation ✔ Digital Marketing ✔ Content Creation
🔗 https://domestika.sjv.io/dynKAW
🛠️ Recommended Tools & Resources
🔥 AppSumo
Discover exclusive lifetime deals on:
✔ AI Tools ✔ Productivity Software ✔ Developer Utilities ✔ Marketing Platforms ✔ Business Applications
A must-have resource for developers, creators, freelancers, and entrepreneurs looking to save money while accessing premium tools.
🔗 https://appsumo.8odi.net/L04a33
🛒 Shopify
Looking to start an online business or launch an eCommerce store?
Shopify provides everything you need to build, manage, and scale an online business.
✔ Online Store Builder ✔ Payment Integration ✔ Inventory Management ✔ Marketing Tools
🔗 https://shopify.pxf.io/Vxv09k
🌐 WordPress, WooCommerce & Jetpack
Create professional websites, blogs, and online stores with one of the most trusted web ecosystems in the world.
Ideal for:
✔ Personal Blogs ✔ Portfolio Websites ✔ Business Websites ✔ eCommerce Stores
🔗 https://automattic.pxf.io/Z6vR5W
🌍 Language Learning Resources
🗣️ Preply
Learn English and other languages through personalized one-on-one tutoring sessions with experts from around the world.
🔗 https://preply.sjv.io/o4gBDY
📚 British Council English Online
Improve your professional communication skills and English fluency through structured learning programs.
🔗 https://englishonline.sjv.io/9VOGa4
🧠 Rosetta Stone
One of the most recognized language-learning platforms for immersive language acquisition.
🔗 https://aff.rosettastone.com/X4OyqG
🧪 Science & Educational Resources
🔬 MEL Science
Interactive science kits and educational experiences designed to make STEM learning engaging and practical.
🔗 https://imp.i328067.net/bk2beg
📖 Carson Dellosa Education
Educational materials and learning resources for students, teachers, and lifelong learners.
🔗 https://carsondellosaeducation.sjv.io/E0JbjW
❤️ Support My Work
Creating detailed technical content, tutorials, guides, and learning resources takes significant time and effort.
If you find my articles helpful and would like to support my work, you can do so through the following platforms:
⭐ Become a GitHub Sponsor
Support my open-source contributions, technical content, and community projects.
🔗 https://github.com/sponsors/hritikranjan1
☕ Buy Me a Chai
Enjoying my content? Consider buying me a chai and supporting future tutorials, guides, and educational resources.
🔗 https://www.chai4.me/hritikranjan
👨💻 Connect With Me
Hritik Ranjan
💡 AI Enthusiast ☁️ DevOps Learner 🔐 Cybersecurity Advocate 💻 Software Developer
Connect & Follow
🔗 GitHub: https://github.com/hritikranjan1
🔗 LinkedIn: https://linkedin.com/in/hritikranjan1
📢 Found This Article Helpful?
If this article added value to your learning journey:
✅ Share it with your network
✅ Bookmark it for future reference
✅ Follow for more DevOps, AI, Cloud, Cybersecurity, and Software Engineering content
Thank you for reading and being part of this learning journey.
Keep Learning. Keep Building. Keep Growing. 🚀
🏷️ Suggested Tags for Hashnode
AWS
DevOps
CI/CD
AWS CodePipeline
AWS CodeDeploy
Amazon EC2
Docker
GitHub
Cloud
Python
Flask
Continuous Delivery