
Building a Three-Tier DevOps Learning Tracker on Kubernetes with Minikube — Complete End-to-End Guide
From Docker Compose to Kubernetes — Architecture, Deployment, Persistent Storage, Real Troubleshooting, Bugs, Fixes, and DevOps Interview Learnings
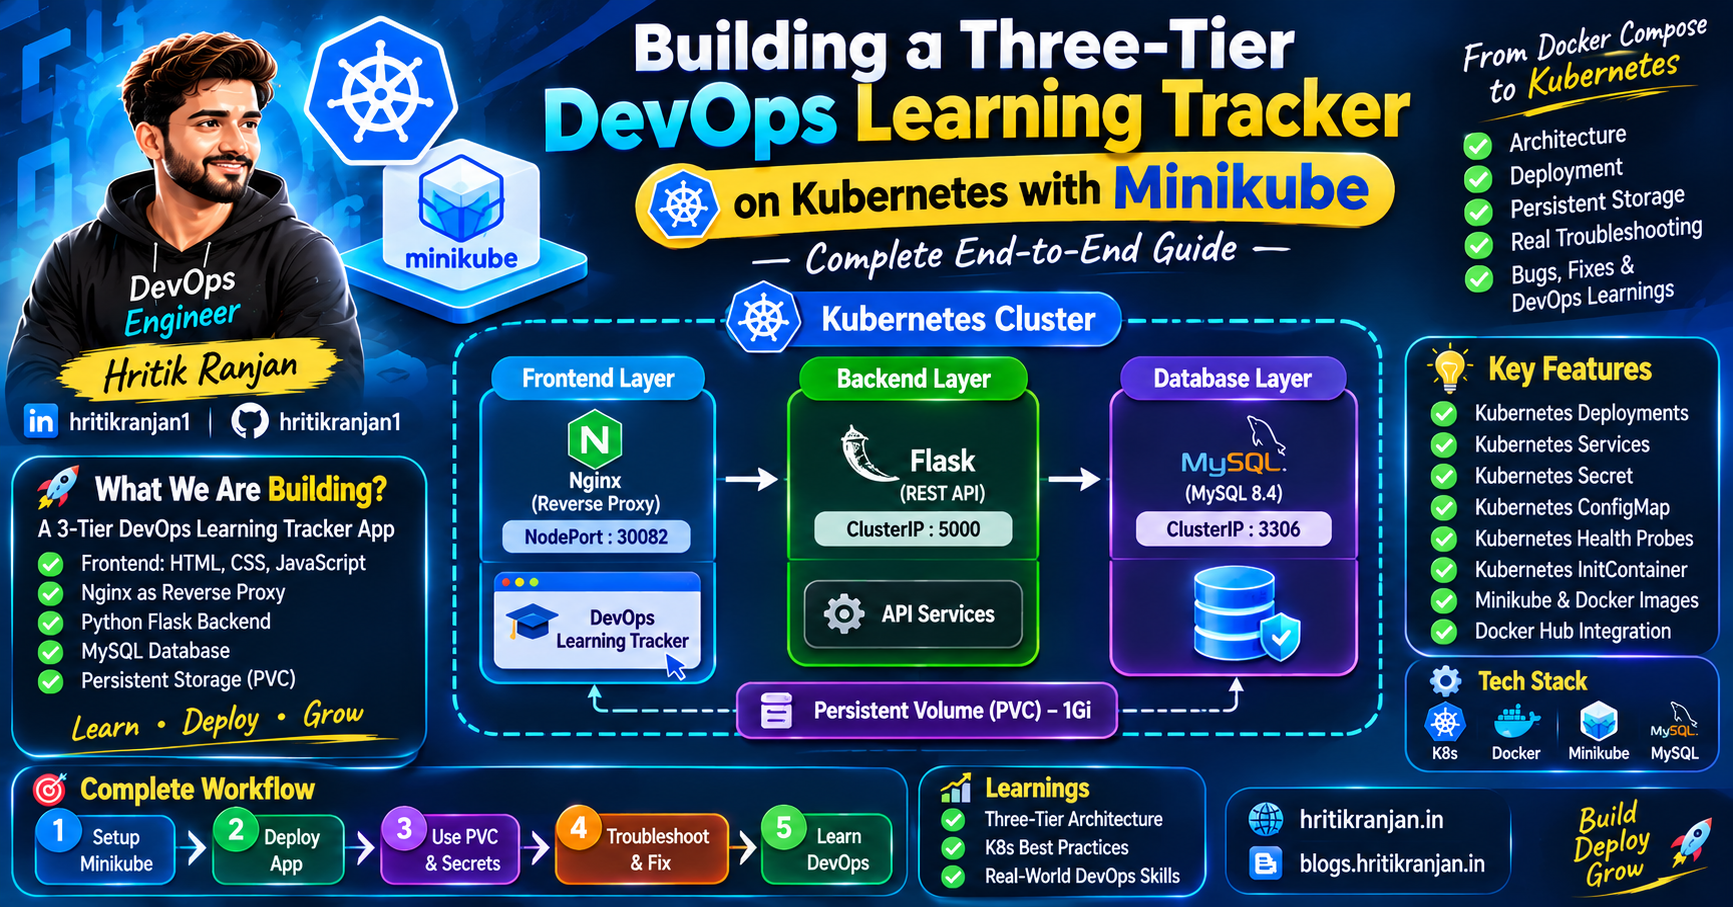
Note: This article is intentionally beginner-friendly. I have explained the commands, Kubernetes resources, networking, storage, health checks, troubleshooting, and the real issues encountered during the project instead of only showing the final YAML.
🚀 What We Are Building
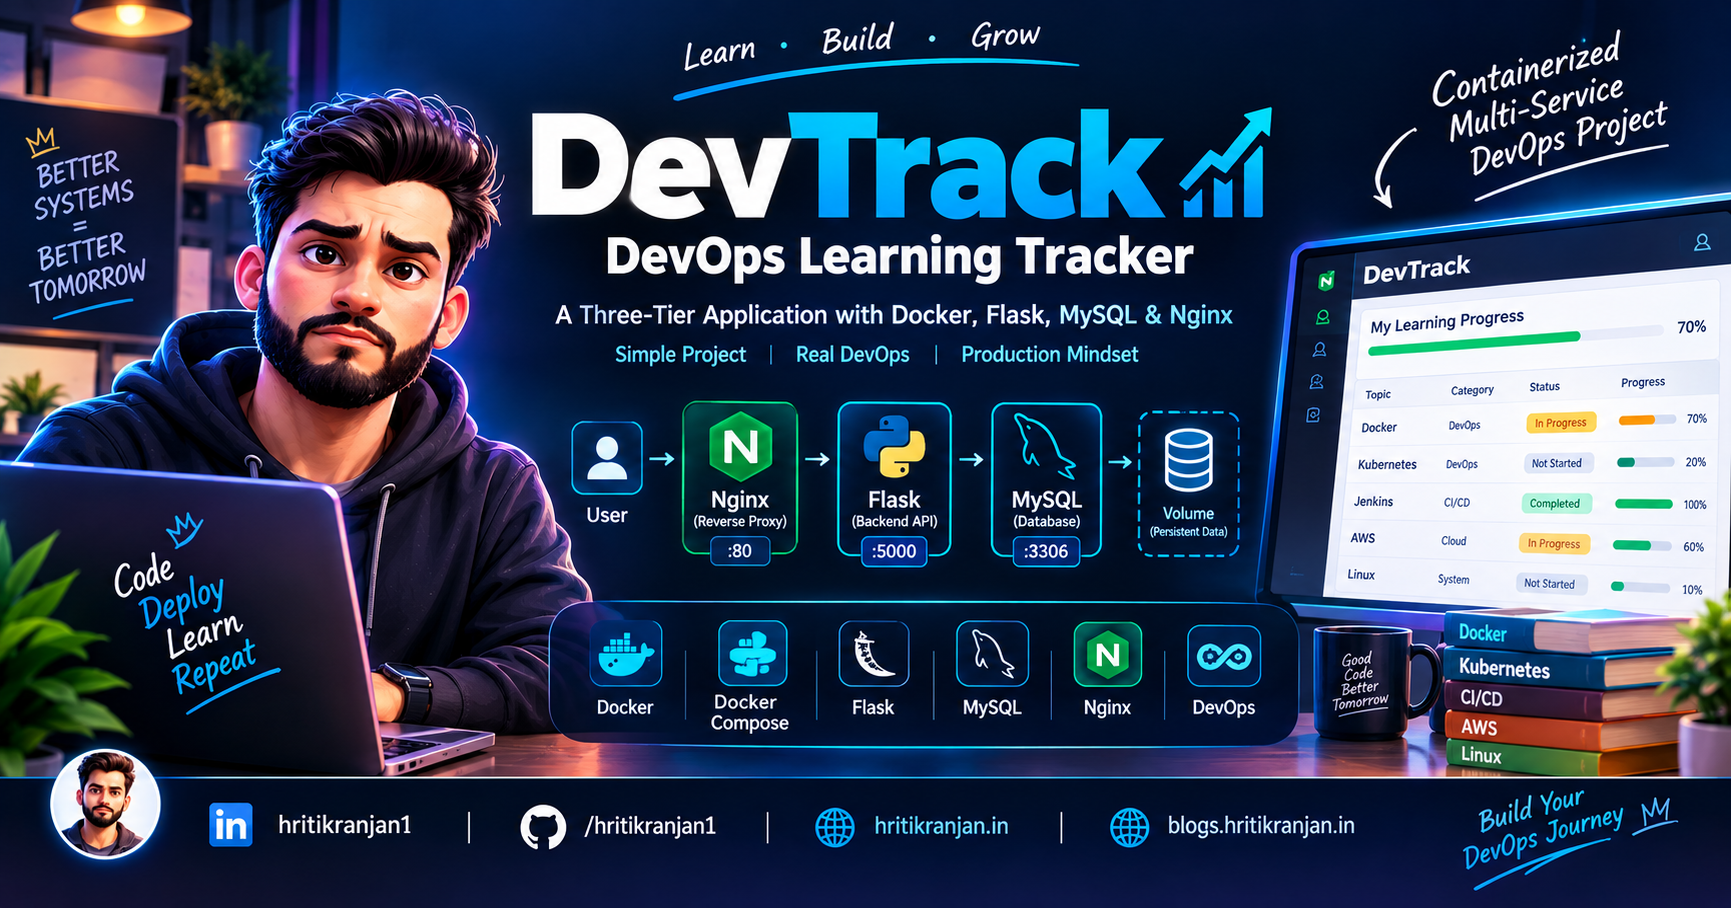
In this project, we will deploy a complete three-tier DevOps Learning Tracker application on a local Kubernetes cluster using Minikube.
The application contains:
- Frontend using HTML, CSS and JavaScript
- Nginx as a reverse proxy
- Python Flask backend
- MySQL database
- Persistent storage using Kubernetes PVC
- Kubernetes Deployments
- Kubernetes Services
- Kubernetes Secret
- Kubernetes ConfigMap
- Kubernetes health probes
- Kubernetes initContainer
- Minikube
- Docker images
- Docker Hub
The final architecture looks like this:
                         USER
                          │
                          │ HTTP
                          ▼
                ┌─────────────────────┐
                │       NGINX         │
                │  Reverse Proxy      │
                │  Frontend Server    │
                │                     │
                │     NodePort        │
                │       30082         │
                └──────────┬──────────┘
                           │
                           │ /api/*
                           ▼
                ┌─────────────────────┐
                │       FLASK         │
                │     REST API        │
                │                     │
                │     ClusterIP       │
                │       :5000         │
                └──────────┬──────────┘
                           │
                           │ MySQL
                           ▼
                ┌─────────────────────┐
                │       MYSQL         │
                │      MySQL 8.4      │
                │                     │
                │     ClusterIP       │
                │       :3306         │
                └──────────┬──────────┘
                           │
                           ▼
                ┌─────────────────────┐
                │       PVC           │
                │   mysql-pvc         │
                │       1Gi           │
                └─────────────────────┘
The important idea is:
Browser
   ↓
Nginx
   ↓
Flask
   ↓
MySQL
   ↓
Persistent Storage
Only Nginx is exposed outside the Kubernetes cluster.
👋 Introduction
Hi! I'm Hritik Ranjan, a DevOps and Cloud learner.
In my DevOps learning journey, I built a small three-tier application called DevOps Learning Tracker.
Initially, I containerized the application using Docker Compose.
The Docker Compose architecture looked like:
Frontend
   ↓
Nginx
   ↓
Flask
   ↓
MySQL
Docker Compose was a great way to understand:
- Containers
- Images
- Networks
- Volumes
- Environment variables
- Service dependencies
- Health checks
- Reverse proxy configuration
But then I wanted to understand the next level:
How would I run the same application using Kubernetes?
So I migrated the application from Docker Compose to Kubernetes using Minikube.
And this is where things became much more interesting.
I encountered real problems involving:
- Docker build context
- Port conflicts
- MySQL startup timing
- Docker BuildKit
ImagePullBackOff- Missing Secrets
- MySQL CrashLoopBackOff
- PVC permissions
- InnoDB corruption
- Nginx
502 Bad Gateway - Kubernetes service discovery
- Pod readiness
- Persistent storage
This article documents the complete journey.
🎯 What You Will Learn
By the end of this guide, you will understand:
- What the DevOps Learning Tracker does
- Why the application is divided into three tiers
- Docker Compose architecture
- Kubernetes architecture
- Minikube
- Namespaces
- Pods
- Deployments
- Services
- NodePort
- ClusterIP
- ConfigMaps
- Secrets
- PersistentVolumes
- PersistentVolumeClaims
- Docker images in Minikube
imagePullPolicy- Init containers
- Readiness probes
- Liveness probes
- Kubernetes DNS
- MySQL persistence
- Kubernetes networking
- Troubleshooting
- Docker Compose → Kubernetes migration
- Real-world deployment problems
- Useful Kubernetes commands
- DevOps interview questions
📚 Table of Contents
- Project Overview
- What Does the Application Do?
- Why Build This Project?
- Docker Compose Architecture
- Kubernetes Architecture
- Technology Stack
- Prerequisites
- Project Repository
- Project Structure
- Installing Docker
- Installing kubectl
- Installing Minikube
- Installing Git
- Cloning the Repository
- Docker Images
- Starting Minikube
- Loading Images into Minikube
- Kubernetes Manifests
- Namespace
- Secret
- ConfigMap
- PersistentVolumeClaim
- MySQL Deployment
- MySQL Service
- Flask Deployment
- Flask Service
- Nginx Deployment
- Nginx NodePort Service
- Deploying the Application
- Checking Pods
- Checking Services
- Checking PVC
- Accessing the Application
- Testing the Application
- Testing the Flask API
- Testing MySQL
- Testing Persistent Storage
- Docker Compose vs Kubernetes
- Complete Request Flow
- Kubernetes Networking
- Health Checks
- Real Issues and Fixes
- Troubleshooting Commands
- Security Considerations
- Production Improvements
- DevOps Interview Questions
- What I Learned
- Future Improvements
- Useful Documentation
- Conclusion
🏗️ Project Overview
The DevOps Learning Tracker is a simple web application designed to track DevOps learning topics.
For example, I can add:
Docker
Kubernetes
AWS
Jenkins
Terraform
Ansible
Linux
Git
GitHub Actions
Prometheus
Grafana
Each topic can contain:
- Topic name
- Category
- Status
- Progress percentage
The application also calculates useful statistics.
For example:
Total Topics       → 10
Completed          → 4
In Progress        → 4
Not Started        → 2
Average Progress   → 68%
The application itself is intentionally simple.
The goal is not to build a complicated business application.
The goal is to learn DevOps architecture and deployment.
💡 Why Build This Project?
A simple application is actually useful for learning DevOps because it gives us something real to deploy.
Instead of learning Kubernetes using only:
nginx
hello-world
simple deployment
we have a complete multi-tier application.
We have:
Frontend
Backend
Database
Storage
Networking
Configuration
Secrets
Reverse Proxy
Health Checks
That gives us a much better environment for learning.
🧩 Three-Tier Architecture
The application follows a three-tier architecture.
┌──────────────────────────────┐
│        Presentation Tier     │
│                              │
│     HTML + CSS + JavaScript  │
│            Nginx             │
└──────────────┬───────────────┘
               │
               ▼
┌──────────────────────────────┐
│       Application Tier       │
│                              │
│          Flask API           │
└──────────────┬───────────────┘
               │
               ▼
┌──────────────────────────────┐
│           Data Tier          │
│                              │
│           MySQL              │
│                              │
│             ↓                │
│            PVC               │
└──────────────────────────────┘
🐳 Docker Compose Architecture
Before Kubernetes, the application was containerized using Docker Compose.
Docker Compose allows multiple related containers to be defined and managed from a YAML configuration.
The architecture was:
                  Browser
                     │
                     ▼
              ┌─────────────┐
              │    Nginx    │
              │    :80      │
              └──────┬──────┘
                     │
                     ▼
              ┌─────────────┐
              │   Flask     │
              │   :5000     │
              └──────┬──────┘
                     │
                     ▼
              ┌─────────────┐
              │   MySQL     │
              │   :3306     │
              └──────┬──────┘
                     │
                     ▼
              Docker Volume
Docker Compose handled:
- Services
- Networking
- Environment variables
- Volumes
- Health checks
- Dependencies
☸️ Why Kubernetes?
Docker Compose is excellent for local multi-container development.
But Kubernetes provides many additional capabilities for managing containerized applications.
Kubernetes can help with:
- Self-healing
- Service discovery
- Scaling
- Rolling updates
- Configuration management
- Secrets
- Persistent storage
- Health checks
- Load balancing
- Desired-state management
Official Kubernetes documentation describes Kubernetes as a platform for managing containerized workloads and services. (Kubernetes)
For this project, I wanted to understand those concepts practically.
🏛️ Final Kubernetes Architecture
Here is the final architecture:
                         ┌───────────────┐
                         │     USER      │
                         │   Browser     │
                         └───────┬───────┘
                                 │
                                 │ HTTP
                                 ▼
                    ┌────────────────────────┐
                    │         NGINX          │
                    │                        │
                    │  Frontend + Proxy      │
                    │                        │
                    │     NodePort: 30082    │
                    └───────────┬────────────┘
                                │
                                │ /api/*
                                ▼
                    ┌────────────────────────┐
                    │        FLASK           │
                    │                        │
                    │      REST API          │
                    │      ClusterIP         │
                    │        :5000           │
                    └───────────┬────────────┘
                                │
                                │ db:3306
                                ▼
                    ┌────────────────────────┐
                    │        MYSQL           │
                    │                        │
                    │       MySQL 8.4        │
                    │       ClusterIP        │
                    │        :3306           │
                    └───────────┬────────────┘
                                │
                                │
                                ▼
                    ┌────────────────────────┐
                    │          PVC           │
                    │       mysql-pvc        │
                    │          1Gi           │
                    └────────────────────────┘
🔍 Understanding the Request Flow
Suppose the user opens:
http://<minikube-ip>:30082
The request travels like this:
Browser
   │
   ▼
NodePort 30082
   │
   ▼
Nginx Service
   │
   ▼
Nginx Pod
   │
   ├── Frontend files
   │
   └── /api/*
          │
          ▼
       Flask Service
          │
          ▼
       Flask Pod
          │
          ▼
       MySQL Service
          │
          ▼
       MySQL Pod
          │
          ▼
       PVC
This is the most important flow to understand.
🛠️ Technology Stack
| Layer | Technology |
|---|---|
| Frontend | HTML, CSS, JavaScript |
| Reverse Proxy | Nginx |
| Backend | Python 3, Flask, Flask-CORS |
| Database | MySQL 8.4 |
| Containerization | Docker |
| Local orchestration | Kubernetes |
| Kubernetes environment | Minikube |
| CLI | kubectl |
| Registry | Docker Hub |
| Storage | PersistentVolumeClaim |
| Configuration | ConfigMap |
| Secrets | Kubernetes Secret |
📦 Prerequisites
Before starting, make sure you have:
| Requirement | Minimum |
|---|---|
| Operating System | Ubuntu 20.04+, macOS, or Windows + WSL2 |
| RAM | 4 GB free |
| CPU | 2 cores |
| Disk | 5 GB free |
| Internet | Required for initial image downloads |
| Docker | Installed |
| kubectl | Installed |
| Minikube | Installed |
| Git | Installed |
For this tutorial, Linux/Ubuntu commands are used.
📁 Project Repository
The Kubernetes version of the project is:
github.com/hritikranjan1/devops-learning-tracker-k8s
The project contains both application code and Kubernetes manifests.
📂 Project Structure
The repository looks like this:
devops-learning-tracker-k8s/
│
├── backend/
│   ├── Dockerfile
│   ├── app.py
│   └── requirements.txt
│
├── frontend/
│   ├── index.html
│   ├── style.css
│   └── script.js
│
├── nginx/
│   ├── Dockerfile
│   └── nginx.conf
│
├── k8s/
│   ├── 00-namespace.yaml
│   ├── 01-secret.yaml
│   ├── 02-configmap.yaml
│   ├── 03-mysql-pvc.yaml
│   ├── 04-mysql-deployment.yaml
│   ├── 05-mysql-service.yaml
│   ├── 06-backend-deployment.yaml
│   ├── 07-backend-service.yaml
│   ├── 08-nginx-deployment.yaml
│   └── 09-nginx-service.yaml
│
├── README.md
├── USER_GUIDE.md
├── ARCHITECTURE.md
├── WORKFLOW.md
├── ISSUES.md
└── INTERVIEW_QA.md
The Kubernetes manifests are numbered so they can be applied in a logical order.
🖼️ Free Visuals for the Article
You can use the following open-source icon CDN images inside Hashnode if you want a more attractive article.


You can also use Mermaid diagrams in sections where Hashnode supports Mermaid rendering.
For example:
flowchart TD
    A[User Browser] --> B[Nginx]
    B --> C[Flask API]
    C --> D[MySQL]
    D --> E[Persistent Volume]
Another useful visual:
flowchart LR
    A[Browser] -->|NodePort 30082| B[Nginx]
    B -->|web:5000| C[Flask]
    C -->|db:3306| D[MySQL]
    D --> E[PVC]
These diagrams are especially useful because they are directly connected to the architecture of this project.
🚀 Step 1 — Install Docker
Docker is required because Minikube will use the Docker driver.
On Ubuntu:
sudo apt update
sudo apt install -y docker.io
Start Docker:
sudo systemctl enable --now docker
Add your user to the Docker group:
sudo usermod -aG docker $USER
Apply the group without logging out:
newgrp docker
Verify:
docker --version
Also verify Docker is running:
docker ps
If Docker is working, you should not receive a permission error.
🚀 Step 2 — Install kubectl
kubectl is the command-line tool used to communicate with the Kubernetes API server.
Download the latest stable version:
curl -LO "https://dl.k8s.io/release/$(curl -L -s https://dl.k8s.io/release/stable.txt)/bin/linux/amd64/kubectl"
Install it:
sudo install -o root -g root -m 0755 kubectl /usr/local/bin/kubectl
Remove the downloaded binary:
rm kubectl
Verify:
kubectl version --client
🚀 Step 3 — Install Minikube
Minikube creates a local Kubernetes environment.
Download Minikube:
curl -LO https://storage.googleapis.com/minikube/releases/latest/minikube-linux-amd64
Install it:
sudo install minikube-linux-amd64 /usr/local/bin/minikube
Remove the downloaded file:
rm minikube-linux-amd64
Verify:
minikube version
🚀 Step 4 — Install Git
If Git is not installed:
sudo apt install -y git
Verify:
git --version
📥 Step 5 — Clone the Project
Move to your Desktop:
cd ~/Desktop
Clone the repository:
git clone https://github.com/hritikranjan1/devops-learning-tracker-k8s.git
Move into the project:
cd devops-learning-tracker-k8s
Check the files:
ls
🐳 Step 6 — Understand the Docker Images
The Kubernetes deployment uses three main images.
MySQL
mysql:8.4
This is the database image.
Flask Backend
hritikranjan1/devops-learning-tracker-backend:1.0
This contains the Flask API.
Nginx
hritikranjan1/devops-learning-tracker-nginx:1.0
This contains Nginx, the frontend files and reverse proxy configuration.
📥 Pull the Images
Run:
docker pull mysql:8.4
docker pull hritikranjan1/devops-learning-tracker-backend:1.0
docker pull hritikranjan1/devops-learning-tracker-nginx:1.0
Verify:
docker images | grep -E "mysql|devops-learning"
You should see the images.
☸️ Step 7 — Start Minikube
Start Minikube using Docker:
minikube start --driver=docker --memory=4096 --cpus=2
Let's understand the command:
minikube start
Starts the cluster.
--driver=docker
Uses Docker as the Minikube driver.
--memory=4096
Allocates approximately 4 GB RAM.
--cpus=2
Allocates 2 CPU cores.
🔎 Verify Minikube
Run:
minikube status
You should see something similar to:
host: Running
kubelet: Running
apiserver: Running
kubeconfig: Configured
Now check Kubernetes nodes:
kubectl get nodes
Expected:
NAME       STATUS   ROLES           AGE   VERSION
minikube   Ready    control-plane   ...   v1.xx.x
The important part is:
STATUS = Ready
📦 Step 8 — Load Docker Images into Minikube
This is a very important step.
Minikube has its own container environment.
Even if an image exists on your host:
Host Docker
    │
    └── backend:1.0
that does not automatically mean the Minikube runtime has the image.
So we explicitly load the images.
Run:
minikube image load mysql:8.4
minikube image load hritikranjan1/devops-learning-tracker-backend:1.0
minikube image load hritikranjan1/devops-learning-tracker-nginx:1.0
Minikube officially provides minikube image load for loading container images into the Minikube environment. (minikube)
Verify:
minikube image ls | grep -E "mysql|devops-learning"
You should see the images.
❓ Why Load Images Manually?
Without this step, Kubernetes may try:
Pod starts
   ↓
Image not available locally
   ↓
Try Docker Hub
   ↓
Network problem
   ↓
ErrImagePull
   ↓
ImagePullBackOff
By loading the image:
Docker image
     ↓
Minikube
     ↓
Pod
we avoid depending on Docker Hub during deployment.
For local development, this can be very useful.
📜 Step 9 — Understanding Kubernetes Manifests
The k8s directory contains:
00-namespace.yaml
01-secret.yaml
02-configmap.yaml
03-mysql-pvc.yaml
04-mysql-deployment.yaml
05-mysql-service.yaml
06-backend-deployment.yaml
07-backend-service.yaml
08-nginx-deployment.yaml
09-nginx-service.yaml
Each YAML file describes part of the desired Kubernetes state.
Kubernetes objects are persistent API entities used to represent the desired state of resources in a cluster. (Kubernetes)
1️⃣ 00-namespace.yaml
apiVersion: v1
kind: Namespace
metadata:
  name: devtrack
This creates:
devtrack
namespace.
🤔 What Is a Namespace?
A namespace provides logical separation inside a Kubernetes cluster.
Instead of putting everything into:
default
we create:
devtrack
Now our resources are grouped:
devtrack
│
├── MySQL
├── Flask
├── Nginx
├── Services
├── Secret
├── ConfigMap
└── PVC
Check it:
kubectl get namespaces
2️⃣ 01-secret.yaml
The database credentials are stored separately.
apiVersion: v1
kind: Secret
metadata:
  name: db-secret
  namespace: devtrack
type: Opaque

stringData:
  MYSQL_ROOT_PASSWORD: rootpassword
  MYSQL_DATABASE: devops_tracker
  MYSQL_USER: devuser
  MYSQL_PASSWORD: devpassword
🔐 Why Use a Secret?
We don't want database credentials directly inside every Deployment.
Instead:
Secret
  │
  ├── root password
  ├── database name
  ├── username
  └── password
The application can consume these values.
Kubernetes provides Secrets for storing sensitive configuration such as passwords and tokens. (Kubernetes)
Important: Kubernetes Secrets are not automatically equivalent to a full production secret-management system. In a production environment, additional security controls and external secret management may be appropriate.
3️⃣ 02-configmap.yaml
Not every configuration value is secret.
For example:
apiVersion: v1
kind: ConfigMap
metadata:
  name: db-config
  namespace: devtrack

data:
  DB_HOST: db
  DB_NAME: devops_tracker
🔧 ConfigMap vs Secret
A simple way to remember:
ConfigMap
    ↓
Normal configuration

Secret
    ↓
Sensitive configuration
Examples:
ConfigMap
DB_HOST=db
DB_NAME=devops_tracker
Secret
DB_PASSWORD=********
4️⃣ 03-mysql-pvc.yaml
This is one of the most important Kubernetes resources in the project.
apiVersion: v1
kind: PersistentVolumeClaim
metadata:
  name: mysql-pvc
  namespace: devtrack

spec:
  accessModes:
    - ReadWriteOnce

  resources:
    requests:
      storage: 1Gi
💾 What Is a PVC?
PVC means:
PersistentVolumeClaim
The application is asking Kubernetes:
"I need 1 GB of persistent storage."
Pod
 │
 ▼
PVC
 │
 ▼
Persistent Storage
Persistent volumes are designed to have a lifecycle independent of an individual Pod. (Kubernetes)
❓ Why Does MySQL Need Persistent Storage?
Imagine we don't use a PVC.
MySQL Pod
    ↓
Database
The Pod gets deleted.
MySQL Pod
    X
The database data can disappear with the Pod's ephemeral filesystem.
With a PVC:
MySQL Pod
    │
    ▼
MySQL Data
    │
    ▼
PVC
If the Pod is recreated:
Old MySQL Pod
      X
      │
      ▼
     PVC
      │
      ▼
New MySQL Pod
The new Pod can mount the same persistent storage.
🔐 ReadWriteOnce
The configuration uses:
accessModes:
  - ReadWriteOnce
This means the volume is requested for read-write use from a single node.
For this local Minikube setup, that is sufficient for the single MySQL instance.
5️⃣ 04-mysql-deployment.yaml
The MySQL workload runs using a Deployment.
Important parts include:
spec:
  strategy:
    type: Recreate
and:
template:
  spec:
    securityContext:
      fsGroup: 999
and:
containers:
  - name: mysql
    image: mysql:8.4
🔄 Why Recreate?
The MySQL workload uses a single PVC.
The deployment therefore uses:
strategy:
  type: Recreate
The basic idea is:
Old Pod
   ↓
Stopped
   ↓
New Pod
   ↓
Starts with PVC
This avoids trying to run old and new instances simultaneously against the same single-writer storage setup.
👤 Why fsGroup: 999?
One of the actual problems encountered during this project was:
Permission denied
The volume was not writable by the MySQL process.
The configuration uses:
securityContext:
  fsGroup: 999
This helps provide appropriate group ownership/access for the mounted volume.
This became important because MySQL needs to write files into its data directory.
⏳ MySQL Startup Time
MySQL does not necessarily become ready instantly.
Especially during first initialization:
Pod starts
   ↓
MySQL initializes
   ↓
Database files created
   ↓
System tables initialized
   ↓
MySQL becomes ready
If Kubernetes checks too aggressively, it can incorrectly consider MySQL unhealthy.
Therefore the deployment uses a longer probe initialization period.
Example:
livenessProbe:
  initialDelaySeconds: 60
6️⃣ 05-mysql-service.yaml
The MySQL Service is:
apiVersion: v1
kind: Service

metadata:
  name: db
  namespace: devtrack

spec:
  selector:
    app: db

  ports:
    - port: 3306

  type: ClusterIP
🌐 Why Create a Service?
Pods are temporary.
Suppose MySQL Pod IP is:
10.244.0.15
The Pod gets deleted.
New Pod:
10.244.0.21
If Flask directly used the Pod IP, the configuration would break.
Instead:
Flask
  ↓
db:3306
  ↓
Kubernetes Service
  ↓
MySQL Pod
The Service provides a stable endpoint for the application. Kubernetes Services are specifically designed to provide stable networking for changing sets of Pods. (Kubernetes)
🧠 Kubernetes DNS
The Service name is:
db
So Flask can connect using:
db:3306
instead of:
localhost:3306
This is extremely important.
❌ Why Not localhost?
Inside the Flask Pod:
localhost
means:
Flask Pod itself
It does not mean:
MySQL Pod
So this is wrong:
DB_HOST=localhost
Correct:
DB_HOST=db
Because:
db
is the Kubernetes Service name.
7️⃣ 06-backend-deployment.yaml
The Flask application is deployed using a Deployment.
One particularly important section is the initContainer.
initContainers:
  - name: wait-for-mysql
    image: mysql:8.4
    command:
      - sh
      - -c
      - |
        until mysqladmin ping -h db -u root -p"$MYSQL_ROOT_PASSWORD" --silent; do
          echo "waiting for mysql..."
          sleep 3
        done
⏱️ Why Use an InitContainer?
Docker Compose has a concept such as:
depends_on:
  db:
    condition: service_healthy
Kubernetes does not provide the same Compose-style depends_on mechanism.
Instead, we can make the Flask Pod wait before its main container starts.
The flow becomes:
Flask Pod starts
       │
       ▼
InitContainer starts
       │
       ▼
Check MySQL
       │
       ├── Not ready
       │      ↓
       │    Wait 3 sec
       │      ↓
       │    Check again
       │
       └── Ready
              ↓
       Flask container starts
This was an important part of migrating the application from Compose to Kubernetes.
8️⃣ 07-backend-service.yaml
The Flask backend is exposed internally through a Kubernetes Service.
The Service is:
web
and uses port:
5000
The architecture is:
Nginx
  ↓
web:5000
  ↓
Flask Pod
Because this is an internal backend, it doesn't need to be exposed through NodePort.
It uses:
ClusterIP
9️⃣ 08-nginx-deployment.yaml
Nginx handles two important responsibilities:
1. Frontend
It serves:
HTML
CSS
JavaScript
2. Reverse Proxy
API requests are forwarded to Flask.
For example:
/api/learning
is forwarded to:
web:5000
The flow:
Browser
   │
   ▼
Nginx
   │
   ├── /          → Frontend
   │
   └── /api/*    → Flask
🔟 09-nginx-service.yaml
Nginx is the only service exposed outside the cluster.
spec:
  type: NodePort

  ports:
    - port: 80
      targetPort: 80
      nodePort: 30082
🌍 What Is NodePort?
NodePort exposes a Kubernetes Service on a port of the cluster node.
In our case:
NodePort = 30082
So:
Browser
   ↓
Minikube IP:30082
   ↓
Nginx Service
   ↓
Nginx Pod
Minikube supports NodePort access and provides the minikube service command for obtaining the service URL. (minikube)
🔢 Why 30082?
Kubernetes NodePorts normally use the range:
30000-32767
So:
30082
fits within that range.
🔒 Why Are Flask and MySQL Not NodePort?
Because users don't need direct access to them.
We want:
Internet/User
      ↓
    Nginx
      ↓
    Flask
      ↓
    MySQL
Not:
Internet
 ├── Nginx
 ├── Flask
 └── MySQL
Keeping internal services internal gives us a cleaner architecture.
🚀 Step 20 — Deploy Everything
Once the files are ready:
kubectl apply -f k8s/
Expected output will look similar to:
namespace/devtrack created
secret/db-secret created
configmap/db-config created
persistentvolumeclaim/mysql-pvc created
deployment.apps/db created
service/db created
deployment.apps/web created
service/web created
deployment.apps/nginx created
service/nginx created
🔎 Step 21 — Check the Pods
Run:
kubectl get pods -n devtrack
Initially, you may see:
NAME                    READY   STATUS
db-xxxxx                0/1     ContainerCreating
web-xxxxx               0/1     Init:0/1
nginx-xxxxx             0/1     ContainerCreating
Wait.
Run:
kubectl get pods -n devtrack
again.
Eventually:
NAME                    READY   STATUS
db-xxxxx                1/1     Running
web-xxxxx               1/1     Running
nginx-xxxxx             1/1     Running
This is what we want.
👀 Watch Pods Live
Instead of repeatedly running the command:
kubectl get pods -n devtrack
you can use:
kubectl get pods -n devtrack -w
The -w means:
watch
Kubernetes will continue showing changes.
Stop watching with:
Ctrl + C
🔎 Step 22 — Check Services
Run:
kubectl get svc -n devtrack
You should see something similar to:
NAME    TYPE        CLUSTER-IP      PORT(S)
db      ClusterIP   10.x.x.x        3306/TCP
web     ClusterIP   10.x.x.x        5000/TCP
nginx   NodePort    10.x.x.x        80:30082/TCP
The important difference:
db      → ClusterIP
web     → ClusterIP
nginx   → NodePort
💾 Step 23 — Check the PVC
Run:
kubectl get pvc -n devtrack
Expected:
NAME        STATUS   VOLUME   CAPACITY   ACCESS MODES
mysql-pvc   Bound    ...      1Gi        RWO
The important status is:
Bound
This means the claim has been successfully associated with storage.
🔐 Step 24 — Check Secret and ConfigMap
Run:
kubectl get secret -n devtrack
and:
kubectl get configmap -n devtrack
You should see:
db-secret
and:
db-config
📋 Check Everything Together
One useful command:
kubectl get all -n devtrack
And:
kubectl get pvc,secret,configmap -n devtrack
🌍 Step 25 — Access the Application
Run:
minikube service nginx -n devtrack
Minikube will provide a URL for the Service.
The URL may look similar to:
http://192.168.49.2:30082
Depending on your Minikube configuration, the actual address may be different.
🔗 Get Only the URL
You can also use:
minikube service nginx -n devtrack --url
This is useful when you want the URL without manually finding the NodePort.
🖥️ Application Dashboard
After opening the URL, the DevOps Learning Tracker dashboard should appear.
The dashboard contains:
Total Topics
Average Progress
Completed Topics
Learning Topics
It also provides functionality for adding and managing learning items.
➕ Step 26 — Test the Application
Click:
Add Learning
Enter:
Topic:
Docker Compose

Category:
Docker

Status:
Completed

Progress:
100
Save it.
The application should update its statistics.
For example:
Total Topics: 1
Completed: 1
Average Progress: 100%
➕ Add Another Topic
Add:
Topic:
Kubernetes

Category:
Kubernetes

Status:
In Progress

Progress:
60
Now the application should show approximately:
Total Topics: 2
Completed: 1
Average Progress: 80%
Because:
(100 + 60) / 2 = 80
🧪 Step 27 — Test the Flask Health Endpoint
The Flask backend exposes:
/api/health
You can test it from inside the Flask Pod.
Run:
kubectl exec -n devtrack deploy/web -- \
  wget -qO- http://localhost:5000/api/health
Expected:
{
  "status": "healthy",
  "service": "flask"
}
This confirms the Flask application is responding.
🗄️ Step 28 — Test MySQL Directly
We can execute a MySQL command inside the database Pod.
Run:
kubectl exec -it -n devtrack deploy/db -- \
  mysql -u devuser -pdevpassword devops_tracker \
  -e "SELECT * FROM learning_items;"
You should see the stored records.
This proves:
Application
   ↓
Flask
   ↓
MySQL
   ↓
Database table
is working.
🔍 Check Database Tables
You can also open a MySQL shell:
kubectl exec -it -n devtrack deploy/db -- \
  mysql -u devuser -pdevpassword devops_tracker
Then:
SHOW TABLES;
Check the data:
SELECT * FROM learning_items;
Exit:
exit;
💾 Step 29 — The Most Important Demo: Data Persistence
Now let's test whether Kubernetes storage is really working.
First, verify the data:
kubectl exec -it -n devtrack deploy/db -- \
  mysql -u devuser -pdevpassword devops_tracker \
  -e "SELECT * FROM learning_items;"
Suppose we have:
Docker Compose
Kubernetes
AWS
Jenkins
Now delete the MySQL Pod:
kubectl delete pod -n devtrack -l app=db
Kubernetes will create another Pod because the Deployment wants the desired number of replicas.
Check:
kubectl get pods -n devtrack
Wait until MySQL is:
1/1 Running
Now run:
kubectl exec -it -n devtrack deploy/db -- \
  mysql -u devuser -pdevpassword devops_tracker \
  -e "SELECT * FROM learning_items;"
The data should still exist.
🎯 What Did We Prove?
We proved:
Old MySQL Pod
      ↓
     Deleted
      ↓
New MySQL Pod
      ↓
Same PVC
      ↓
Same database data
This is one of the most important concepts in the entire project.
🧠 Docker Volume vs Kubernetes PVC
In Docker Compose:
mysql_data
In Kubernetes:
PersistentVolumeClaim
Conceptually:
Docker Compose
      │
      ▼
Named Volume
      │
      ▼
MySQL data
becomes:
Kubernetes
      │
      ▼
PVC
      │
      ▼
Persistent Storage
      │
      ▼
MySQL data
🌐 Kubernetes Networking
One of the biggest differences between Docker Compose and Kubernetes is how service discovery works.
In Docker Compose:
db
web
nginx
can be used as service names.
In Kubernetes, Services provide stable names.
For example:
db
is the MySQL Service.
web
is the Flask Service.
So:
Flask → db:3306
and:
Nginx → web:5000
🧭 Complete Internal Network
                 devtrack namespace
┌──────────────────────────────────────────────────────┐
│                                                      │
│   ┌─────────────┐                                    │
│   │    nginx    │                                    │
│   │             │                                    │
│   │ NodePort    │                                    │
│   │   30082     │                                    │
│   └──────┬──────┘                                    │
│          │                                           │
│          │ web:5000                                  │
│          ▼                                           │
│   ┌─────────────┐                                    │
│   │     web     │                                    │
│   │   Flask     │                                    │
│   │ ClusterIP   │                                    │
│   └──────┬──────┘                                    │
│          │                                           │
│          │ db:3306                                   │
│          ▼                                           │
│   ┌─────────────┐                                    │
│   │     db      │                                    │
│   │   MySQL     │                                    │
│   │ ClusterIP   │                                    │
│   └──────┬──────┘                                    │
│          │                                           │
│          ▼                                           │
│     ┌─────────┐                                      │
│     │ mysql-pvc│                                     │
│     └─────────┘                                      │
│                                                      │
└──────────────────────────────────────────────────────┘
🩺 Health Checks
Health checks were one of the most important concepts in this project.
Kubernetes supports:
Startup Probe
Liveness Probe
Readiness Probe
Kubernetes uses probe results to determine whether containers are healthy and whether traffic should be sent to them. (Kubernetes)
❤️ Liveness Probe
The liveness probe answers:
Is this container still alive?
If Kubernetes determines that the container is unhealthy, it can restart it.
Conceptually:
Container
   │
   ▼
Liveness Check
   │
   ├── Healthy → Continue
   │
   └── Unhealthy → Restart
🚦 Readiness Probe
Readiness answers:
Is this application ready to receive traffic?
For example, Flask may have started its container but not yet be ready.
In that case:
Pod Running
      ≠
Pod Ready
This distinction is very important.
🟢 Why Readiness Matters
Suppose:
Flask Pod
Running
but the Flask application is still initializing.
Nginx sends traffic.
Without proper readiness:
Nginx
  ↓
Flask
  ↓
Not Ready
  ↓
Error
With readiness:
Flask
  ↓
Readiness check
  ↓
Not Ready
  ↓
Service does not send traffic
This is one reason we encountered the Nginx 502 problem during the project.
🐛 Real Issue #1 — Wrong Docker Build Context
This was one of the first problems.
The Docker build failed because Docker could not find the expected application files.
The problem was related to:
build.context
The context was pointing to the wrong location.
The backend Dockerfile expected:
app.py
requirements.txt
but the build context did not match the backend directory.
❌ Problem
Conceptually:
Project Root
   │
   ├── backend/
   │    ├── Dockerfile
   │    ├── app.py
   │    └── requirements.txt
   │
   └── docker-compose.yml
If Docker builds using the wrong context,:
COPY app.py .
can fail.
✅ Fix
The build context was changed to:
web:
  build:
    context: ./backend
    dockerfile: Dockerfile
Now Docker understands that:
./backend
is the build context.
💡 Lesson
Always understand:
Dockerfile location
+
Build context
+
COPY source path
These three things must match.
🐛 Real Issue #2 — Nginx Port Conflict
Another issue was:
bind: address already in use
The selected host port was already being used.
🔎 Troubleshooting
On Linux:
sudo ss -ltnp | grep :80
or:
sudo lsof -i :80
Docker:
docker ps
✅ Fix
Instead of:
8080:80
the application was changed to use:
8082:80
The important concept is:
Host Port : Container Port
So:
8082:80
means:
localhost:8082
      ↓
Nginx container :80
🐛 Real Issue #3 — Flask Started Before MySQL Was Ready
This was a classic container startup problem.
Containers can start close together, but:
Container started
does not always mean:
Application ready
The sequence was:
MySQL container starts
       │
       ├── MySQL still initializing
       │
       ▼
Flask starts
       │
       ▼
Flask tries MySQL
       │
       ▼
Connection refused
❌ Error
Flask reported a MySQL connection problem.
✅ Fix
A MySQL health check was added.
Conceptually:
MySQL
  ↓
Health Check
  ↓
Healthy
  ↓
Flask
The Compose deployment also used:
depends_on:
  db:
    condition: service_healthy
A retry mechanism was also added in the Flask application.
🐛 Real Issue #4 — Docker BuildKit Problem
During development, Docker BuildKit failed with an error similar to:
context canceled
The root cause was related to a stale:
DOCKER_HOST
environment variable and BuildKit behavior.
🔎 Troubleshooting
Check:
echo $DOCKER_HOST
Check Docker context:
docker context show
✅ Fix
The stale variable was removed:
unset DOCKER_HOST
Then the build was tested with:
DOCKER_BUILDKIT=0 docker build .
💡 Lesson
When Docker behaves unexpectedly, don't immediately delete everything.
Check:
docker context show
and:
echo $DOCKER_HOST
Environment configuration can change Docker's behavior.
🐛 Real Issue #5 — ErrImagePull / ImagePullBackOff
After moving to Kubernetes, Pods were unable to obtain images.
The Pod entered states such as:
ErrImagePull
and:
ImagePullBackOff
🔎 What Does ImagePullBackOff Mean?
Kubernetes is trying to obtain the image.
Pod
 ↓
Need image
 ↓
Pull image
 ↓
Failed
 ↓
Retry
 ↓
Backoff
✅ Fix
Instead of relying completely on Docker Hub from inside Minikube, images were loaded directly:
minikube image load mysql:8.4
minikube image load hritikranjan1/devops-learning-tracker-backend:1.0
minikube image load hritikranjan1/devops-learning-tracker-nginx:1.0
The deployment also uses an appropriate pull policy such as:
imagePullPolicy: IfNotPresent
🐛 Real Issue #6 — CreateContainerConfigError
Another problem was:
secret "db-secret" not found
🔎 Why Did This Happen?
The Deployment expected:
db-secret
but Kubernetes couldn't find the Secret in the expected namespace.
Remember:
devtrack/db-secret
is different from:
default/db-secret
Kubernetes resources are namespace-scoped where applicable.
🔎 Check
kubectl get secret -n devtrack
If it is missing:
kubectl apply -f k8s/01-secret.yaml
💡 Lesson
Always check:
Resource name
+
Namespace
+
Reference name
🐛 Real Issue #7 — MySQL CrashLoopBackOff
This was one of the most difficult issues.
MySQL entered:
CrashLoopBackOff
The logs showed an InnoDB problem involving redo log files and database files.
Conceptually:
MySQL
  ↓
Crash
  ↓
Partial database state
  ↓
PVC retains that state
  ↓
MySQL starts again
  ↓
InnoDB recovery problem
  ↓
CrashLoopBackOff
🔎 What Made This Difficult?
The problem was not simply:
MySQL image is broken
The issue involved the interaction between:
MySQL
+
PVC
+
Startup failure
+
Database files
+
Permissions
+
Probe timing
✅ Fix
The recovery involved:
1. Removing the broken namespace/PVC state
Because the environment was a development environment and the data could be recreated.
kubectl delete namespace devtrack
Then redeploy.
2. Adding:
securityContext:
  fsGroup: 999
3. Giving MySQL more startup time
For example:
livenessProbe:
  initialDelaySeconds: 60
4. Using:
strategy:
  type: Recreate
5. Starting again with fresh storage
⚠️ Important Production Warning
Deleting a PVC can destroy persistent database data depending on the storage lifecycle and configuration.
Never blindly run:
kubectl delete pvc
on a production database.
Always verify:
What data is stored?
Do we have backups?
Is the environment disposable?
What is the reclaim policy?
For this learning project, recreating the database was acceptable.
🐛 Real Issue #8 — PVC Permission Denied
Another MySQL error was similar to:
Can't create/write to file
Permission denied
🔎 Cause
The mounted volume permissions did not allow the MySQL process to write properly.
Conceptually:
PVC
 ↓
Mounted
 ↓
MySQL process
 ↓
Write
 ↓
Permission denied
✅ Fix
The Pod security context was configured with:
securityContext:
  fsGroup: 999
This helped ensure the mounted volume was accessible to the MySQL process.
💡 Lesson
Whenever a stateful application reports:
Permission denied
check:
UID
GID
fsGroup
Volume ownership
Mount path
Container user
🐛 Real Issue #9 — Nginx 502 Bad Gateway
After the Kubernetes deployment, the browser showed:
502 Bad Gateway
especially for API calls.
🧠 What Does 502 Mean Here?
Nginx is working.
But Nginx cannot successfully reach the upstream Flask application.
The flow is:
Browser
   ↓
Nginx
   ↓
Flask
   X
🔎 Troubleshooting
First:
kubectl get pods -n devtrack
Check Flask.
Then:
kubectl logs -n devtrack deploy/web
Check Nginx:
kubectl logs -n devtrack deploy/nginx
Check Services:
kubectl get svc -n devtrack
And one of the most useful commands:
kubectl get endpoints -n devtrack
🔎 Why Endpoints Matter
Suppose:
web Service
exists.
But Flask isn't ready.
Then:
web Service
      ↓
No ready endpoints
Nginx has nowhere healthy to send traffic.
Once Flask becomes Ready:
web Service
      ↓
Flask Pod endpoint
Nginx can communicate successfully.
🐛 Real Issue #10 — DNS Resolution
Another issue involved Flask resolving:
db
🔎 Kubernetes DNS Flow
Flask uses:
db
Kubernetes resolves:
db
 ↓
MySQL Service
 ↓
MySQL Pod
But if the MySQL Service has no ready backend:
db
 ↓
Service
 ↓
No ready endpoint
the application cannot successfully communicate with MySQL.
Once MySQL became healthy and its endpoints were available, service discovery worked correctly.
🧰 Troubleshooting Method I Used
One of the biggest things I learned was:
Don't randomly change YAML files. Troubleshoot layer by layer.
My troubleshooting flow became:
                 Problem
                    │
                    ▼
             Check Pod Status
                    │
                    ▼
              Check Events
                    │
                    ▼
                Check Logs
                    │
                    ▼
             Check Service
                    │
                    ▼
          Check Service Endpoints
                    │
                    ▼
            Check Configuration
                    │
                    ▼
             Check Networking
                    │
                    ▼
              Check Storage
🔎 Step 1 — Check Pods
kubectl get pods -n devtrack
Look for:
Running
Pending
CrashLoopBackOff
ImagePullBackOff
ErrImagePull
CreateContainerConfigError
Init:0/1
🔎 Step 2 — Describe a Pod
kubectl describe pod <pod-name> -n devtrack
At the bottom, pay attention to:
Events
Events often tell you:
Image problem
Mount problem
Scheduling problem
Secret problem
Probe failure
Permission problem
🔎 Step 3 — Check Logs
Backend:
kubectl logs -n devtrack deploy/web
MySQL:
kubectl logs -n devtrack deploy/db
Nginx:
kubectl logs -n devtrack deploy/nginx
🔎 Step 4 — Check Previous Logs
If a container crashed:
kubectl logs -n devtrack deploy/db --previous
This can be extremely useful for CrashLoopBackOff problems.
🔎 Step 5 — Check Services
kubectl get svc -n devtrack
🔎 Step 6 — Check Endpoints
kubectl get endpoints -n devtrack
For newer Kubernetes environments, EndpointSlices are the modern API behind service endpoint information, but checking service connectivity and backend endpoints remains an important troubleshooting concept. (Kubernetes)
🔎 Step 7 — Check PVC
kubectl get pvc -n devtrack
Then:
kubectl describe pvc mysql-pvc -n devtrack
Look for:
Status: Bound
🔎 Step 8 — Check Secrets
kubectl get secret -n devtrack
🔎 Step 9 — Check ConfigMaps
kubectl get configmap -n devtrack
🧪 Useful Debugging Commands
Get everything:
kubectl get all -n devtrack
Get Pods:
kubectl get pods -n devtrack -o wide
Get Services:
kubectl get svc -n devtrack
Get PVC:
kubectl get pvc -n devtrack
Get resources:
kubectl get deployments -n devtrack
🖥️ Execute Commands Inside Pods
Flask:
kubectl exec -it -n devtrack deploy/web -- sh
MySQL:
kubectl exec -it -n devtrack deploy/db -- sh
Nginx:
kubectl exec -it -n devtrack deploy/nginx -- sh
🔄 Deployment Rollouts
Check rollout:
kubectl rollout status deployment/web -n devtrack
Restart:
kubectl rollout restart deployment/web -n devtrack
Check rollout history:
kubectl rollout history deployment/web -n devtrack
Rollback:
kubectl rollout undo deployment/web -n devtrack
🧹 Cleanup
To delete the application:
kubectl delete namespace devtrack
Because all application resources are inside the namespace, this provides a convenient cleanup boundary.
Stop Minikube:
minikube stop
Delete the entire Minikube cluster:
minikube delete
Be careful with:
kubectl delete namespace devtrack
because this removes resources inside the namespace.
And be especially careful with persistent storage.
🔄 Docker Compose → Kubernetes Mapping
One of the most useful parts of this project is understanding how the Compose concepts map to Kubernetes.
| Docker Compose | Kubernetes |
|---|---|
services.db |
Deployment + Service |
services.web |
Deployment + Service |
services.nginx |
Deployment + Service |
.env |
ConfigMap + Secret |
| Docker named volume | PVC |
| Compose network | Kubernetes networking + Services |
depends_on |
InitContainer / application readiness |
healthcheck |
Readiness/Liveness/Startup probes |
| Host port mapping | NodePort |
| Container service name | Kubernetes Service DNS |
mem_limit |
Kubernetes resource limits |
| Container | Pod |
| Compose service | Deployment + Service |
Docker Compose is specifically designed to define and run multi-container applications and manage services, networks and volumes through a Compose configuration. (Docker Documentation)
🐳 Compose Architecture
docker-compose.yml
       │
       ├── db
       ├── web
       └── nginx
☸️ Kubernetes Architecture
Kubernetes breaks those responsibilities into multiple resources.
Namespace
   │
   ├── Secret
   ├── ConfigMap
   ├── PVC
   │
   ├── MySQL Deployment
   │      └── MySQL Pod
   │
   ├── MySQL Service
   │
   ├── Flask Deployment
   │      └── Flask Pod
   │
   ├── Flask Service
   │
   ├── Nginx Deployment
   │      └── Nginx Pod
   │
   └── Nginx NodePort Service
This is one of the major lessons from migrating the project.
🧠 Kubernetes Concepts Learned
Pod
A Pod is the basic deployable unit in Kubernetes.
In this project:
MySQL Pod
Flask Pod
Nginx Pod
Deployment
Deployment manages Pods.
For example:
Deployment
    ↓
Pod
If the Pod dies, Kubernetes can create another one to match the desired state.
Service
Service provides stable networking to Pods.
Example:
web
db
nginx
ClusterIP
Used for internal communication.
Flask → db
Nginx → web
NodePort
Used to expose Nginx externally in this local Minikube project.
Browser
   ↓
30082
   ↓
Nginx
ConfigMap
Stores normal configuration.
DB_HOST=db
DB_NAME=devops_tracker
Secret
Stores sensitive configuration.
MYSQL_PASSWORD
MYSQL_ROOT_PASSWORD
PVC
Provides persistent storage for MySQL.
MySQL
  ↓
PVC
InitContainer
Runs before the main application container.
In this project:
wait-for-mysql
checks whether MySQL is ready.
Readiness Probe
Controls whether a Pod should receive traffic.
Liveness Probe
Helps Kubernetes detect unhealthy containers that should be restarted.
🔐 Security Considerations
This is a learning project, so some credentials are intentionally simple.
For example:
devpassword
rootpassword
In production, this should not be handled this way.
❌ Don't Commit Real Credentials
Avoid committing:
.env
passwords
private keys
API tokens
cloud credentials
into Git.
Use:
Kubernetes Secrets
and, for production environments, consider external secret-management solutions.
🔒 Production Security Improvements
A production deployment should consider:
- Strong credentials
- Secret rotation
- TLS/HTTPS
- NetworkPolicies
- RBAC
- Image scanning
- Non-root containers where practical
- Resource limits
- SecurityContext
- Database backups
- Audit logging
- Monitoring
- Restricted container capabilities
📊 Resource Limits
For production workloads, resources should be considered carefully.
Example:
resources:
  requests:
    memory: "256Mi"
    cpu: "100m"

  limits:
    memory: "512Mi"
    cpu: "500m"
The actual values should be based on measurements rather than copied blindly.
🏭 How I Would Make This Production-Ready
The current project is designed primarily for learning Kubernetes locally.
For production, I would improve several areas.
1. Use Ingress
Instead of exposing Nginx with a raw NodePort:
NodePort 30082
I could use:
Ingress
and expose the application through a hostname.
For example:
devtrack.example.com
2. Add HTTPS
Use:
TLS
with an appropriate certificate-management solution.
Architecture:
User
 ↓
HTTPS
 ↓
Ingress
 ↓
Nginx
 ↓
Flask
3. Use Gunicorn
Instead of Flask's development server:
python app.py
a production deployment could use a production WSGI server such as:
Gunicorn
4. Add CI/CD
A GitHub Actions workflow could perform:
Git Push
    ↓
GitHub Actions
    ↓
Run Tests
    ↓
Build Docker Image
    ↓
Security Scan
    ↓
Push Image
    ↓
Deploy to Kubernetes
5. Add Monitoring
For example:
Prometheus
+
Grafana
could be used to monitor:
CPU
Memory
Pod health
Application metrics
Request rates
6. Add Centralized Logging
A production environment should have a proper logging strategy.
For example:
Application Logs
       ↓
Log Collector
       ↓
Centralized Storage
       ↓
Dashboard
7. Database Backups
MySQL is stateful.
So production needs:
Backups
+
Restore testing
+
Monitoring
A PVC alone is not a complete backup strategy.
This is a very important distinction.
8. StatefulSet
For a more production-oriented MySQL architecture, I would investigate:
StatefulSet
rather than treating MySQL exactly like a stateless web application.
9. HorizontalPodAutoscaler
The Flask backend could potentially be scaled horizontally:
             Nginx
            /     \
           /       \
      Flask-1     Flask-2
           \       /
            \     /
             MySQL
A HorizontalPodAutoscaler could automate scaling based on suitable metrics.
🔥 DevOps Interview Questions Based on This Project
This project gives you many interview questions.
Q1. Explain your project in 30 seconds.
Answer
"I built a three-tier DevOps Learning Tracker using HTML, CSS, JavaScript, Flask and MySQL. Initially I containerized it using Docker Compose, and then migrated it to Kubernetes using Minikube. Nginx works as the reverse proxy, Flask provides the REST API, and MySQL stores the application data. I used Kubernetes Deployments, Services, ConfigMaps, Secrets, a PersistentVolumeClaim, health probes and an initContainer. I also troubleshot real issues such as ImagePullBackOff, MySQL CrashLoopBackOff, PVC permission problems and Nginx 502 errors."
Q2. Why did you use Kubernetes?
Answer
"I wanted to move beyond basic containerization and understand container orchestration, service discovery, persistent storage, health checks, self-healing and declarative deployment."
Q3. Why Minikube?
Answer
"Minikube provides a convenient local Kubernetes environment, so I could learn Kubernetes concepts without needing a cloud cluster."
Q4. Why is Nginx exposed using NodePort?
Answer
"Nginx is the external entry point of the application. In this local Minikube setup, I used a NodePort so that I could access the application from outside the cluster."
Q5. Why are Flask and MySQL ClusterIP?
Answer
"They only need internal communication. Nginx communicates with Flask and Flask communicates with MySQL, so there is no reason to expose those services directly outside the cluster."
Q6. Why not use localhost for MySQL?
Answer
"Because localhost inside the Flask Pod refers to the Flask container itself. MySQL is running behind a different Kubernetes Service. Therefore Flask connects to the MySQL Service using
db:3306."
Q7. What happens when MySQL Pod is deleted?
Answer
"The Deployment recreates the Pod, and the new MySQL Pod mounts the same PVC. Therefore the database data remains available."
Q8. What is the difference between Pod and Deployment?
Answer
"A Pod is the unit in which containers run. A Deployment manages the desired number and lifecycle of Pods and can recreate them when they fail."
Q9. What is a Service?
Answer
"A Service provides a stable network endpoint for a group of Pods. It prevents applications from depending directly on changing Pod IP addresses."
Q10. What is ClusterIP?
Answer
"ClusterIP is the default Service type and provides internal cluster networking."
Q11. What is NodePort?
Answer
"NodePort exposes a Service through a port on the Kubernetes node, allowing external access to the Service."
Q12. What is a ConfigMap?
Answer
"A ConfigMap stores non-sensitive configuration that can be injected into Pods."
Q13. What is a Secret?
Answer
"A Secret stores sensitive configuration such as passwords and tokens."
Q14. What is a PVC?
Answer
"A PersistentVolumeClaim is a request for persistent storage. I use it for MySQL so database data survives Pod recreation."
Q15. What is ImagePullBackOff?
Answer
"It means Kubernetes couldn't successfully pull the required container image and is retrying with backoff."
Q16. How did you fix ImagePullBackOff?
Answer
"Because this was a local Minikube environment and image pulling was unreliable, I loaded the images directly into Minikube using
minikube image loadand configured the workload to use local images when appropriate."
Q17. What caused the Nginx 502?
Answer
"Nginx could not successfully reach the Flask backend because the Flask Service did not yet have a ready backend endpoint. I checked Pod readiness, Service configuration and endpoints."
Q18. How did you troubleshoot it?
Answer
kubectl get pods -n devtrack
kubectl logs -n devtrack deploy/web
kubectl get svc -n devtrack
kubectl get endpoints -n devtrack
Q19. Why use an initContainer?
Answer
"I used an initContainer to wait for MySQL to become reachable before starting the Flask application. This provides a Kubernetes-oriented solution to the startup dependency problem."
Q20. What is the difference between readiness and liveness?
Answer
"Readiness determines whether the application should receive traffic. Liveness determines whether the container is still healthy enough to continue running and may trigger a restart."
Q21. Why did MySQL need a longer initial delay?
Answer
"MySQL can take time during initialization, especially when creating or recovering database files. If probes run too early, Kubernetes may incorrectly restart it."
Q22. What happened with the PVC?
Answer
"I encountered a permissions problem where MySQL couldn't write to the mounted storage. I addressed it using the Pod security context and
fsGroup."
Q23. What was your most difficult issue?
A good personal answer:
"The most difficult issue was MySQL CrashLoopBackOff combined with persistent storage. I initially had an unhealthy database state, and because the PVC retained the database files, restarting the Pod didn't simply reset everything. I had to understand the relationship between the Pod, PVC, MySQL initialization, permissions and probe timing."
Q24. What did you learn from the project?
Answer
"I learned that Kubernetes is not just Docker running in a different place. Kubernetes introduces a completely different resource model around Pods, Deployments, Services, storage, configuration and health management. I also learned that stateful workloads such as MySQL require much more careful handling than stateless applications."
🧪 Complete Kubernetes Command Cheat Sheet
Cluster
minikube start --driver=docker --memory=4096 --cpus=2
minikube status
minikube stop
minikube delete
Nodes
kubectl get nodes
kubectl describe node minikube
Namespace
kubectl get namespaces
kubectl get all -n devtrack
Pods
kubectl get pods -n devtrack
kubectl get pods -n devtrack -o wide
kubectl get pods -n devtrack -w
kubectl describe pod <pod-name> -n devtrack
Logs
kubectl logs <pod-name> -n devtrack
kubectl logs -n devtrack deploy/web
kubectl logs -n devtrack deploy/db
kubectl logs -n devtrack deploy/nginx
Previous container:
kubectl logs <pod-name> -n devtrack --previous
Services
kubectl get svc -n devtrack
kubectl describe svc db -n devtrack
kubectl describe svc web -n devtrack
kubectl describe svc nginx -n devtrack
Endpoints
kubectl get endpoints -n devtrack
Deployments
kubectl get deployments -n devtrack
kubectl describe deployment web -n devtrack
Rollouts
kubectl rollout status deployment/web -n devtrack
kubectl rollout restart deployment/web -n devtrack
kubectl rollout history deployment/web -n devtrack
kubectl rollout undo deployment/web -n devtrack
PVC
kubectl get pvc -n devtrack
kubectl describe pvc mysql-pvc -n devtrack
Secrets
kubectl get secret -n devtrack
ConfigMaps
kubectl get configmap -n devtrack
Execute Commands
kubectl exec -it -n devtrack deploy/web -- sh
kubectl exec -it -n devtrack deploy/nginx -- sh
kubectl exec -it -n devtrack deploy/db -- sh
MySQL
kubectl exec -it -n devtrack deploy/db -- \
  mysql -u devuser -pdevpassword devops_tracker
Then:
SHOW TABLES;
SELECT * FROM learning_items;
Apply Manifests
kubectl apply -f k8s/
Delete Namespace
kubectl delete namespace devtrack
🗺️ Complete Deployment Flow
The complete deployment process can be remembered like this:
Clone Repository
      │
      ▼
Install Docker
      │
      ▼
Install kubectl
      │
      ▼
Install Minikube
      │
      ▼
Start Minikube
      │
      ▼
Load Docker Images
      │
      ▼
Create Namespace
      │
      ▼
Create Secret
      │
      ▼
Create ConfigMap
      │
      ▼
Create PVC
      │
      ▼
Deploy MySQL
      │
      ▼
Create MySQL Service
      │
      ▼
Deploy Flask
      │
      ▼
Create Flask Service
      │
      ▼
Deploy Nginx
      │
      ▼
Create NodePort Service
      │
      ▼
Check Pods
      │
      ▼
Check Services
      │
      ▼
Check PVC
      │
      ▼
Open Application
      │
      ▼
Test CRUD
      │
      ▼
Test Persistence
🔄 Complete Application Request Flow
Let's look at the request from the user's perspective.
Suppose the user clicks:
Add Learning
The frontend sends an API request.
Browser
   │
   │ POST /api/learning
   ▼
Nginx
   │
   │ proxy_pass
   ▼
Flask
   │
   │ SQL INSERT
   ▼
MySQL
   │
   │ Write
   ▼
PVC
Then the response travels back:
PVC
 ↓
MySQL
 ↓
Flask
 ↓
Nginx
 ↓
Browser
🔁 Complete Read Flow
When the dashboard loads:
Browser
   │
   │ GET /api/learning
   ▼
Nginx
   │
   ▼
Flask
   │
   ▼
MySQL
   │
   ▼
learning_items
   │
   ▼
Flask JSON response
   │
   ▼
Nginx
   │
   ▼
Browser
🧠 The Biggest Lesson: Stateless vs Stateful
The project contains both.
Stateless components
Nginx
Flask
These can be recreated without losing application database data.
Stateful component
MySQL
MySQL needs persistent storage.
That's why:
PVC
is critical.
🏗️ Why This Architecture Is Useful
This architecture separates responsibilities.
Nginx
HTTP entry point
Frontend
Reverse proxy
Flask
Application logic
REST APIs
Database interaction
MySQL
Persistent data
PVC
Database storage
This makes the application easier to reason about and troubleshoot.
📈 Scaling Concept
Suppose the Flask application receives more traffic.
Instead of:
Nginx
  ↓
Flask
we could have:
             Nginx
            /     \
           /       \
      Flask-1     Flask-2
           \       /
            \     /
             MySQL
Kubernetes can manage multiple replicas of stateless workloads.
For example:
replicas: 2
Then:
Flask Pod 1
Flask Pod 2
can run behind the Flask Service.
⚠️ Why I Would Not Simply Scale MySQL the Same Way
MySQL is stateful.
Running multiple MySQL Pods is not equivalent to running multiple Flask Pods.
Database scaling introduces concerns such as:
- Data consistency
- Replication
- Storage
- Failover
- Backup
- Recovery
- Leader election
- Stateful identities
This is why databases require more careful architecture.
🧠 Docker Compose vs Kubernetes — My Experience
One of my biggest observations was:
Docker Compose hides many details. Kubernetes forces you to understand them.
With Compose:
docker compose up
can start the whole application.
With Kubernetes, we explicitly define:
Namespace
Secret
ConfigMap
PVC
Deployment
Service
Probe
InitContainer
NodePort
That initially feels more complicated.
But it also teaches you what is actually happening.
📖 What I Learned
1. Containers are only the beginning
Creating:
Dockerfile
is only one part of DevOps.
The bigger picture includes:
Build
Deploy
Network
Storage
Configuration
Secrets
Health
Monitoring
Scaling
2. Service discovery is extremely important
I learned why:
db
is better than hardcoding an IP address.
Pods are replaceable.
Services provide stable endpoints.
3. Stateful applications require special attention
Running Flask is relatively simple.
Running MySQL requires thinking about:
Storage
Permissions
Startup
Recovery
Backups
Probes
4. Health checks can affect application behavior
A bad readiness probe can prevent traffic.
A bad liveness probe can restart a healthy application.
For databases, aggressive probes can be especially dangerous.
5. Troubleshooting is a major DevOps skill
The project taught me not to panic when I see:
CrashLoopBackOff
ImagePullBackOff
502
Pending
Permission denied
Instead:
Check status
 ↓
Check events
 ↓
Check logs
 ↓
Check dependencies
 ↓
Check network
 ↓
Check storage
🐛 My Main Project Lessons
The real issues made the project much more valuable.
I didn't just deploy the application successfully.
I learned how to recover when things went wrong.
The major issues were:
1. Wrong Docker build context
2. Nginx port conflict
3. Flask/MySQL startup race
4. Docker BuildKit issue
5. ImagePullBackOff
6. Missing Secret
7. MySQL CrashLoopBackOff
8. PVC permission issue
9. Nginx 502
10. Kubernetes service/DNS dependency issue
These are much more useful for DevOps learning than simply showing:
kubectl apply -f .
and saying:
"It worked."
📚 Project Documentation
The repository also contains detailed documentation.
README
Project overview and quick-start information.
USER_GUIDE.md
Beginner-friendly setup and usage instructions.
ARCHITECTURE.md
Architecture and design decisions.
WORKFLOW.md
How the Kubernetes resources connect.
ISSUES.md
Real deployment issues and fixes.
INTERVIEW_QA.md
Interview questions based on the project.
This documentation is important because writing down troubleshooting steps forces you to understand the root cause instead of simply remembering the command that fixed it.
🚀 Future Improvements
This project currently provides a strong Kubernetes foundation.
Here are the next improvements I would build.
1. Kubernetes Ingress
Instead of:
NodePort:30082
I want:
devtrack.example.com
with an Ingress controller.
2. HTTPS/TLS
Add:
TLS
+
Certificate Management
3. HorizontalPodAutoscaler
Automatically scale Flask based on resource usage.
Traffic
   ↓
More CPU
   ↓
HPA
   ↓
More Flask Pods
4. Helm
Convert all Kubernetes manifests into a Helm chart.
Instead of:
kubectl apply -f k8s/
the application could eventually be installed using:
helm install devtrack ./devtrack-chart
5. CI/CD
Build:
GitHub
   ↓
GitHub Actions
   ↓
Test
   ↓
Build Docker Images
   ↓
Scan Images
   ↓
Push to Registry
   ↓
Deploy Kubernetes
6. Prometheus + Grafana
Add observability.
Monitor:
CPU
Memory
Pods
Requests
Application health
7. Better Database Architecture
For a production deployment, evaluate a managed database or a properly designed StatefulSet-based architecture rather than treating a single local MySQL Deployment as a production database.
📌 Quick Revision — Remember This Architecture
If you remember nothing else from this article, remember this:
                  USER
                   │
                   ▼
             NodePort 30082
                   │
                   ▼
                NGINX
                   │
                   ▼
              web:5000
                   │
                   ▼
                FLASK
                   │
                   ▼
               db:3306
                   │
                   ▼
                MYSQL
                   │
                   ▼
                 PVC
And:
Nginx → External
Flask → Internal
MySQL → Internal
PVC → Persistent
🎯 Interview-Ready 30-Second Explanation
If an interviewer asks:
"Explain your Kubernetes project."
You can say:
"I built a three-tier DevOps Learning Tracker and first containerized it using Docker Compose. I then migrated it to Kubernetes using Minikube. The architecture contains Nginx as the reverse proxy, Flask as the backend API and MySQL as the database. I used Kubernetes Deployments and Services for the workloads, a NodePort for external access to Nginx, ClusterIP Services for internal communication, a ConfigMap and Secret for configuration, and a PersistentVolumeClaim for MySQL data. I also implemented readiness and liveness checks and an initContainer to handle the MySQL startup dependency. During the project I troubleshot real issues including ImagePullBackOff, MySQL CrashLoopBackOff, PVC permission errors and Nginx 502 errors."
🎤 One-Minute Architecture Explanation
"The user accesses the application through the Nginx NodePort on port 30082. Nginx serves the frontend and forwards
/apirequests to the Flask backend through thewebClusterIP Service. Flask communicates with MySQL through thedbService on port 3306. MySQL stores its data on a PersistentVolumeClaim, so deleting and recreating the MySQL Pod doesn't remove the application data. Configuration is separated into ConfigMaps and Secrets. I also use Kubernetes probes to control application health and an initContainer to wait for MySQL before starting Flask."
🏆 Final Takeaways
This project started as a simple learning tracker.
But the real value was the DevOps architecture around it.
I learned how to move from:
Application
to:
Container
then:
Docker Compose
and finally:
Kubernetes
The journey looked like:
                    APPLICATION
                         │
                         ▼
                       DOCKER
                         │
                         ▼
                 DOCKER COMPOSE
                         │
                         ▼
                    MINIKUBE
                         │
                         ▼
                    KUBERNETES
                         │
          ┌──────────────┼──────────────┐
          ▼              ▼              ▼
       NETWORK         STORAGE       HEALTH
          │              │              │
          ▼              ▼              ▼
      Services          PVC          Probes
          │
          ▼
      NodePort
The biggest lesson for me was:
DevOps is not just about making an application run. It is about making the application deployable, repeatable, observable, recoverable and easier to troubleshoot.
And this project gave me practical experience with exactly that.
📚 References & Official Documentation
For further learning, these are the official resources I used while understanding the concepts covered in this project:
- Kubernetes Concepts: Kubernetes Concepts Documentation
- Kubernetes Overview: Kubernetes Overview
- Kubernetes Services: Kubernetes Services Documentation
- Kubernetes Networking: Kubernetes Networking Documentation
- Kubernetes Probes: Kubernetes Liveness, Readiness and Startup Probes
- Kubernetes Persistent Volumes: Kubernetes Persistent Volumes Documentation
- Kubernetes Tutorials: Kubernetes Tutorials
- Docker Compose: Docker Compose Documentation
- Minikube: Minikube Documentation
- Minikube Image Loading: Minikube Image Documentation
- Minikube Service Access: Minikube Service Access Documentation
🔗 Project & Social Links
If you found this project useful, you can explore my other DevOps work and learning resources:
GitHub: github.com/hritikranjan1
Website: hritikranjan.in
DevOps Blog: blogs.hritikranjan.in
LinkedIn: linkedin.com/in/hritikranjan1/
⭐ If you found the project useful, consider starring the repository and sharing your feedback.
🙌 Thank You for Reading
If you reached this point, thank you! ❤️
I hope this guide helps you understand Kubernetes not only from the theoretical side but also from the real troubleshooting and deployment side.
The most important advice I can give to someone learning DevOps is:
Don't just read Kubernetes documentation.

Build something.
Break it.
Troubleshoot it.
Fix it.
Document it.
Deploy it again.
That is how the concepts start becoming real.
Happy Learning and Happy DevOps! 🚀
About the author
- 👋 Hi, I’m Hritik Ranjan — a B.Tech CSE student and a passionate tech enthusiast focused on Quality Engineering, AI/ML, Cybersecurity, and DevOps. 💡 I enjoy building and testing scalable, secure, and intelligent systems that solve real-world problems. My expertise and interests include: 🔹 Quality Assurance & Testing Hands-on experience in manual and automation testing using Selenium & Java, ensuring high-quality and reliable applications. 🔹 Artificial Intelligence & Machine Learning Exploring advanced algorithms and developing intelligent systems for practical use cases. 🔹 Cybersecurity Focused on vulnerability assessment, security testing, and system hardening. 🔹 Web Development Building responsive and user-friendly applications using modern technologies. 🔹 Data Science Analyzing complex data to extract actionable insights. 💼 Key Projects: 🚀 Blindness Detection System Applied computer vision techniques to detect blindness-related conditions. 🚀 AI-Powered Rail Madad Enhancement Developed an intelligent complaint management system to improve railway customer service. 🚀 Interactive Applications Built multiple projects like quiz apps, calculators, and productivity tools. 🌱 I’m continuously learning and improving my skills in DevOps, Cloud, and Automation to become a well-rounded engineer. 🤝 Open to collaborations, internships, and opportunities in QA, DevOps, AI/ML, and Cybersecurity. 📫 Let’s connect: hritikranjan1408@gmail.com
Comments
Join the discussionNo comments yet. Be the first to comment.