
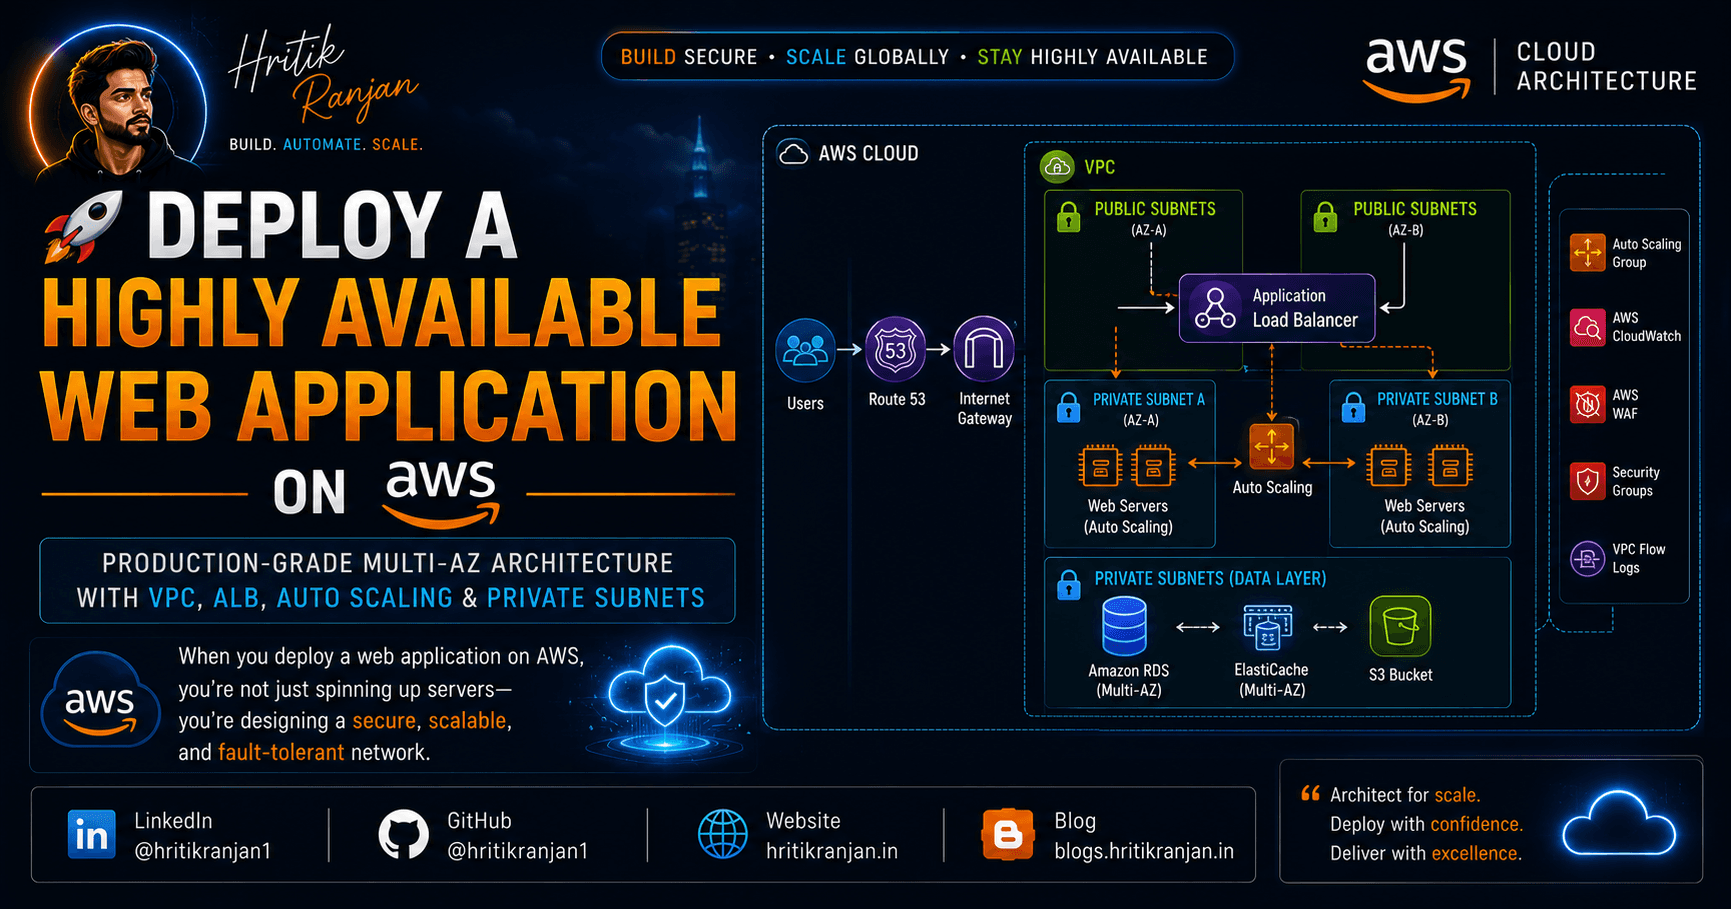
How to Deploy a Highly Available Web Application on AWS: The Complete VPC Blueprint
From isolated data centers to automated scaling—designing a fault-tolerant network across multiple Availability Zones.
🚀 Introduction: Moving Beyond Single-Server Deployments
In the early days of learning the cloud, the easiest way to launch an app is straightforward: spin up a single virtual server, assign it a public IP, and watch it go live. It feels like magic.
But what happens when that single server crashes at 2 AM? What if an entire AWS data center experiences an unexpected power outage? Or worse—what happens when malicious bots scan your public IP and discover an unpatched vulnerability in your database?
In a production environment, availability and security are non-negotiable.
Hosting your entire application in a single Availability Zone (AZ) is a recipe for downtime. Similarly, exposing your backend servers directly to the public internet leaves your infrastructure unnecessarily vulnerable. That is why cloud architects rely on a Multi-AZ Architecture—distributing resources across completely separate physical locations while using public and private subnets to build ironclad security boundaries.
🏢 The Digital Office Building Analogy
If you are new to networking, think of this architecture like a highly secure corporate headquarters:
The VPC is the fenced perimeter of the entire building.
The Public Subnet is the front lobby. Anyone can walk in, talk to the receptionist (the Load Balancer), and request access.
The Private Subnet is the secure vault in the basement. The general public can't see it or walk into it. Only authorized staff who entered through the lobby can access it.
🎯 What You Will Master in This Guide
By the end of this post, you won't just be clicking buttons in the AWS console; you will truly understand the why behind cloud networking. We will cover:
The Architecture Anatomy: The precise purpose of every core VPC component.
Step-by-Step Deployment: How to build a resilient, multi-AZ network from scratch.
The Private Subnet Advantage: Why isolating your application servers is the single best security decision you can make.
Whether you are a beginner taking your first steps into AWS or a developer looking to deploy your side project using professional enterprise standards, this blueprint is built for you. Let’s dive in!

🧩 Prerequisites
Before starting, make sure you have:
An active AWS account with permissions for EC2, VPC, and IAM.
Basic understanding of networking concepts like IP ranges, subnets, and routing, CIDR.
Familiarity with the AWS Management Console or CLI.
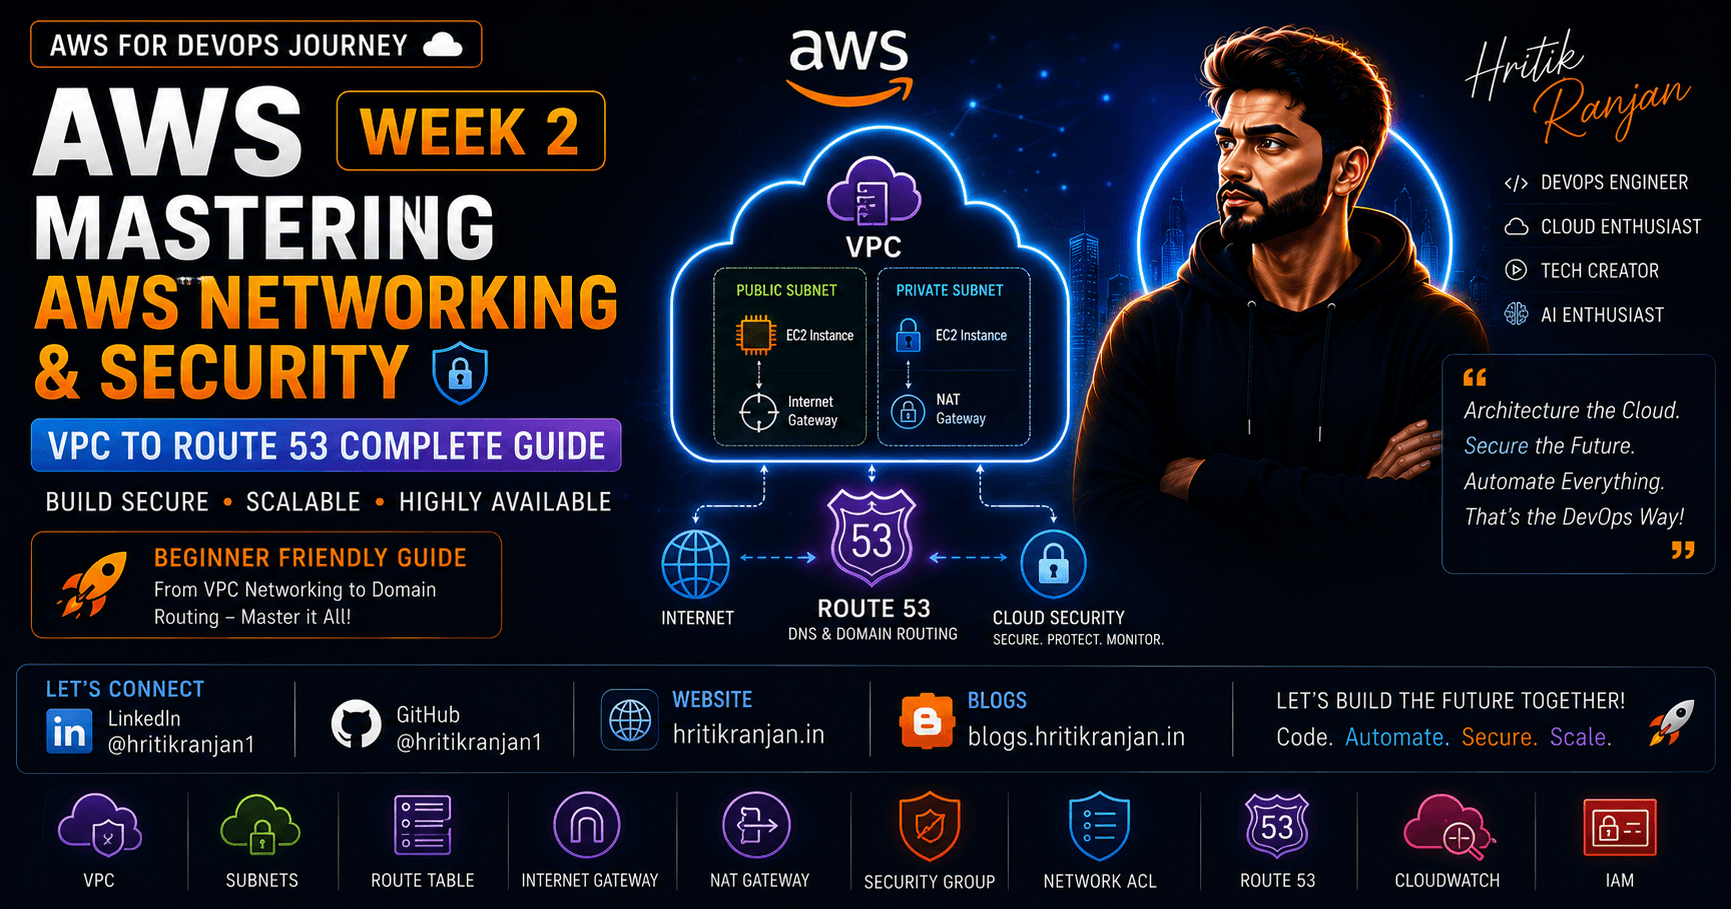
🌩️ Understanding the Core Components of an AWS VPC
Before diving into the actual setup, it is crucial to break down the individual moving parts of an AWS Virtual Private Cloud (VPC). To build an architecture that is both highly available and secure, these 12 core components work together like clockwork.
1. Virtual Private Cloud (VPC)
Think of a VPC as your own isolated, personal data center in the cloud. It is a logically isolated virtual network dedicated to your AWS account. Inside a VPC, you have absolute control over your IP address range, subnets, route tables, and network gateways.
2. Subnets
Subnets allow you to divide your VPC’s IP address range into smaller, manageable chunks or segments.
Public Subnets: These host resources that must be directly accessible from the internet (e.g., Application Load Balancers, Bastion Hosts, or NAT Gateways).
Private Subnets: These host your backend servers, application logic, and databases. They are completely isolated from the public internet.
🔒 Security Win: Placing backend servers in private subnets means they cannot be directly targeted or scanned by malicious internet traffic. They can only be reached internally or through designated entry points.
3. Internet Gateway (IGW)
The Internet Gateway is the front door of your VPC. It is a horizontally scaled, redundant, and highly available AWS component that allows communication between your VPC and the open internet. Only public subnets route traffic through the IGW.
4. NAT Gateway (Network Address Translation)
What happens when a server in a private subnet needs to download a software patch or make an external API call? It uses a NAT Gateway. Placed in a public subnet, it allows private resources to securely send outbound traffic to the internet while completely blocking unauthorized inbound connections from entering.
5. Elastic IP (EIP)
An Elastic IP is a static, persistent public IPv4 address designed for dynamic cloud computing. You allocate it to your AWS account and typically attach it to your NAT Gateway so that your outbound traffic always originates from a consistent, unchanging IP address.
6. Bastion Host (Jump Server)
A Bastion Host is a heavily fortified EC2 instance deployed in a public subnet. Think of it as a secure checkpoint. Instead of opening your private database or backend ports to the world, system administrators SSH/RDP into the Bastion Host first, and from there, securely "jump" into the internal private instances.
7. Route Tables
If subnets are the roads, Route Tables are the GPS navigation systems. A route table contains a set of rules (called routes) that determine where network traffic from your subnet is directed.
Public Subnet Route: Points its default traffic (\(0.0.0.0/0\)) to the Internet Gateway (
igw-xxxx).Private Subnet Route: Points its default traffic (\(0.0.0.0/0\)) to the NAT Gateway (
nat-xxxx).
8. Network Access Control Lists (NACLs)
NACLs act as a subnet-level firewall. They control inbound and outbound traffic moving in and out of your subnets.
- Key Characteristic: They are stateless. This means if you allow inbound traffic on a specific port, you must also explicitly write a rule to allow the outbound response traffic.
9. Security Groups
Security Groups act as an instance-level firewall for your virtual servers (EC2 instances). They control the type of traffic allowed to reach your specific application.
- Key Characteristic: They are stateful. If you allow inbound traffic on port 80 (HTTP), the return outbound traffic is automatically permitted, regardless of outbound rules.
10. Application Load Balancer (ALB)
The ALB serves as your traffic cop. It sits at the application layer (Layer 7) and automatically distributes incoming HTTP/HTTPS traffic across multiple targets—such as EC2 instances or containers—across different Availability Zones (AZs). This ensures no single server gets overwhelmed.
11. Target Groups
A Target Group is a logical grouping of your resources (like a fleet of backend EC2 instances) that sit behind the Application Load Balancer. The ALB routes traffic to the targets defined in the group and continuously runs Health Checks to ensure it only sends traffic to healthy, active servers.
12. Auto Scaling Group (ASG)
An Auto Scaling Group provides elasticity and fault tolerance. It continuously monitors your application's load. If traffic spikes, it automatically provisions new EC2 instances to handle the load. When traffic drops, it gracefully terminates excess instances to save you money. If an instance fails a health check, the ASG instantly replaces it.
💡 Multi-AZ Production Pro-Tips
Before you begin assembling these pieces in the AWS console or via Infrastructure as Code (IaC), keep these architectural best practices in mind:
NAT Gateway High Availability: In a production-grade setup, always deploy one NAT Gateway per Availability Zone. If a single AZ suffers a rare outage, your private instances in the remaining zones will still have uninterrupted outbound internet access through their local NAT Gateway.
The Firewall Synergy: Use Security Groups for your day-to-day granular traffic management (e.g., Allow port 3000 only from the ALB Security Group). Use NACLs as a broad, secondary defense line (e.g., Block a specific malicious IP subnet entirely).
⚙️ Step-by-Step Setup for a Multi-AZ Deployment
Let’s walk through how to build a highly available 2-AZ VPC architecture and deploy a simple web application securely on private subnets.
Step 1: Create the VPC
We’ll start by creating a new VPC using the AWS VPC Wizard.
- Open the VPC Dashboard → Create VPC → VPC and more.

Provide:
Name:
aws-prod-networkingIPv4 CIDR Block:
10.0.0.0/16Availability Zones: Select 2 AZs (e.g.,
ap-south-1aandap-south-1b)

Subnets:
2 Public Subnets (1 per AZ)
2 Private Subnets (1 per AZ)

NAT Gateway:
- Enabled (for both AZs)
Route Tables, Internet Gateway, and Elastic IPs: Created automatically
- VPC Endpoints: None
Click Create VPC.


AWS will automatically provision the necessary subnets, NAT Gateways, route tables, and internet gateways.
Step 2: Create the Auto Scaling Group
We’ll now launch our backend servers using an Auto Scaling Group (ASG).
1. Go to EC2 → Auto Scaling Groups → Create Auto Scaling Group.

2. Create a Launch Template:
Click Create Launch Template
Name:
aws-prod-networking-ec2-templateAMI: Choose a recent Ubuntu or Amazon Linux image
Instance Type:
t2.microKey Pair: Create your key pair i.e
aws_login
Press enter or click to view image in full size


Network Settings:
Create a new Security Group named
aws-prod-networking-sgAttach your VPC (
aws-prod-networking-vpc)Add the following inbound rules:
HTTP (port 22) → Source: Anywhere
Custom TCP (port 8000) → Source: Anywhere


Save and create the template.
3. Go back to the ASG creation page, refresh the template list, and select your new template.

4. Under Network Settings:
Select the same VPC
Choose two Private Subnets in different Availability Zones
Set AZ Distribution to Balanced (best effort)
Press enter or click to view image in full size

5. Skip Load Balancer and VPC Lattice settings for now.

6. Configure Scaling Settings:
Desired Capacity: 2
Minimum: 1
Maximum: 4

7. Click Create Auto Scaling Group.

Your Auto Scaling Group is now active and running EC2 instances in private subnets.

Step 3: Create a Bastion Host
We’ll use a Bastion Host in the public subnet to securely access private EC2 instances.

2. AMI: Choose the latest Ubuntu image.
3. Key Pair: ranjan

4. Network Settings:
VPC:
aws-prod-networking-vpcSubnet: Select one of the Public Subnets
Auto-assign Public IP: Enable
Security Group:
Name: set to Default
Inbound Rule: SSH (port 22) → Source: Anywhere

5. Launch the instance.

Your Bastion Host is now running in the public subnet with SSH access enabled.

Step 4: Connect to Private Instances via Bastion Host
To access your private EC2 instances:
1. Open the Bastion Host instance and click Connect.
Press enter or click to view image in full size
2. Choose either EC2 Instance Connect or your preferred SSH client.


3. Copy your private key (aws_login.pem) to the Bastion Host using a tool like FileZilla or scp.

Once inside your Bastion Host, run:
chmod 400 aws_login.pem
ssh -i "aws_login.pem" ubuntu@<PRIVATE_INSTANCE_IP>


You now have secure SSH access to private EC2 instances — without exposing them to the internet.
Step 5: Enable SSH on Private Subnets
To allow SSH access through the Bastion Host:
Open the EC2 Dashboard → Instances.
Select one of your Private Instances.
Go to Security → Security Groups → Edit Inbound Rules.
Add a new rule:
Type: SSH
Port: 22
Source: Anywhere (or better, restrict to Bastion Host’s security group for tighter security).
5. Save changes and repeat for the second private instance.
Now both private instances can be accessed via SSH from your Bastion Host.
Step 5: Deploy a Simple Web Application in Private Subnets
Inside each private EC2 instance:
1. Create a basic HTML file:
vim index.html

Add this content for any Private Subnet — 1:
<!DOCTYPE html>
<html lang="en">
<head>
    <meta charset="UTF-8">
    <meta name="viewport" content="width=device-width, initial-scale=1.0">
    <title>Multi-AZ Application Demo</title>
    <style>
        body {
            font-family: Arial, sans-serif;
            background-color: #f4f7f9;
            margin: 0;
            padding: 20px;
            color: #333;
        }
        .container {
            max-width: 900px;
            margin: auto;
            background: #fff;
            padding: 30px;
            border-radius: 8px;
            box-shadow: 0 4px 12px rgba(0,0,0,0.1);
        }
        h1 {
            color: #0056b3;
            text-align: center;
            border-bottom: 2px solid #0056b3;
            padding-bottom: 10px;
        }
        .architecture-diagram {
            margin-top: 30px;
            gap: 20px;
        }
        .zone {
            flex: 1;
            background-color: #e9ecef;
            padding: 20px;
            border-radius: 8px;
            border: 1px dashed #6c757d;
            text-align: center;
        }
        .zone h2 {
            margin-top: 0;
            color: #495057;
        }
        .subnet {
            background-color: #d1ecf1;
            padding: 15px;
            border-radius: 5px;
            margin-top: 15px;
            border: 1px solid #bee5eb;
        }
        .app-status {
            margin-top: 15px;
            padding: 10px;
            border-radius: 5px;
            font-weight: bold;
        }
        .status-running {
            background-color: #d4edda;
            color: #155724;
        }
        .status-down {
            background-color: #f8d7da;
            color: #721c24;
        }
        .icon {
            font-size: 40px;
            margin-bottom: 10px;
        }
        .description {
            text-align: center;
            margin-top: 20px;
            font-style: italic;
            color: #555;
        }
    </style>
</head>
<body>

    <div class="container">
        <h1>Application Running in Private Subnets (Multi-AZ)</h1>

        <p class="description">
            This diagram illustrates an application architecture deployed across two distinct Availability Zones for high availability and fault tolerance.
        </p>

        <div class="architecture-diagram">

            <!-- Availability Zone 1 -->
            <div class="zone">
                <h2>Availability Zone A (ap-south-1a)</h2>
                <div class="subnet">
                    <h3>Private Subnet 1</h3>
                    <div class="icon">💻</div>
                    <p>Web/App Server Instance</p>
                    <div class="app-status status-running">
                        Status: **Running**
                    </div>
                </div>
            </div>
        </div>
        <p class="description" style="margin-top: 30px;">
            If one zone fails, traffic can be redirected to the healthy zone, ensuring continuous service availability.
        </p>
    </div>

</body>
</html>

2. Start a simple HTTP server:
python3 -m http.server 8000

Repeat the process on the second instance (AZ-1b), changing the HTML text slightly to identify the Availability Zone.
Note- Same Process
Step 6: Create an Application Load Balancer
We’ll now route external traffic securely to your private instances using an Application Load Balancer (ALB).
1. Go to EC2 → Load Balancers → Create Load Balancer → Application Load Balancer.


2. Name: aws-prod-networking-alb
3. Scheme: Internet-facing
4. Network Mapping:
VPC:
aws-prod-networking-vpcSubnets: Both Public Subnets

5. Security Groups:
Use your existing group (
aws-prod-networking-sg)Uncheck any previous ones

6. Listeners:
Protocol: HTTP
Port: 80
Action: Forward to Target Group → Create Target Group

Target Group Setup:
Type: Instances
Name:
aws-prod-networking-tgProtocol: HTTP
Port: 8000
IP Address Type: IPv4
VPC:
aws-prod-netwokring-vpc
Click Next


Register your private EC2 instances → click Include as pending → Next → Create Target Group.


Go back to the ALB setup, refresh the Target Group list, select your newly created target group, and finish creating the ALB.


Once active, your ALB will securely distribute incoming traffic between private instances across both Availability Zones.
Step 7: Verify the Deployment
After your ALB status changes to Active:
Copy the ALB DNS name.
Open it in your browser.
You’ll see your application served alternately from two different private instances — confirming successful Multi-AZ load balancing.


✅ Congratulations!
Your web application is now deployed on private subnets, secured from direct internet access, and load-balanced for high availability.
🎥 Watch the full setup in action:
https://youtu.be/FZPTL_kNvXc?si=NoR6s50LxSf8lx5m
🚀 Continue Your Learning Journey
Thank you for taking the time to read this article.
Technology is evolving rapidly, and continuous learning is one of the most valuable investments you can make in your career. Whether you're exploring DevOps, Cloud Computing, Artificial Intelligence, Cybersecurity, Software Development, Data Science, or Career Growth, the resources below can help you deepen your knowledge and stay ahead in the industry.
🎓 Recommended Learning Platforms
🚀 Coursera
Learn from world-renowned universities and industry leaders including Google, IBM, Stanford, Microsoft, Meta, and many more.
✔ Professional Certificates ✔ Career-focused Learning Paths ✔ AI & Machine Learning Programs ✔ Cloud & DevOps Certifications ✔ Business & Leadership Courses
🔗 https://imp.i384100.net/k0KvbV
💻 Udemy
One of the largest online learning platforms with practical, hands-on courses covering:
✔ DevOps & Kubernetes ✔ Docker & Cloud Computing ✔ AWS, Azure & GCP ✔ Programming & Development ✔ Cybersecurity & Ethical Hacking
🔗 https://trk.udemy.com/MAL2MY
📊 DataCamp
A great platform for anyone interested in:
✔ Python Programming ✔ SQL & Databases ✔ Data Analytics ✔ Machine Learning ✔ Artificial Intelligence
Interactive learning paths and hands-on projects make it ideal for beginners and professionals alike.
🔗 https://datacamp.pxf.io/nX4kER
🎓 edX
Access high-quality courses and certifications from leading institutions such as:
✔ Harvard University ✔ MIT ✔ Berkeley ✔ Microsoft
Perfect for learners seeking university-level education online.
🎨 Domestika
Enhance your creative skills with courses on:
✔ Graphic Design ✔ Video Editing ✔ Animation ✔ Digital Marketing ✔ Content Creation
🔗 https://domestika.sjv.io/dynKAW
🛠️ Recommended Tools & Resources
🔥 AppSumo
Discover exclusive lifetime deals on:
✔ AI Tools ✔ Productivity Software ✔ Developer Utilities ✔ Marketing Platforms ✔ Business Applications
A must-have resource for developers, creators, freelancers, and entrepreneurs looking to save money while accessing premium tools.
🔗 https://appsumo.8odi.net/L04a33
🛒 Shopify
Looking to start an online business or launch an eCommerce store?
Shopify provides everything you need to build, manage, and scale an online business.
✔ Online Store Builder ✔ Payment Integration ✔ Inventory Management ✔ Marketing Tools
🔗 https://shopify.pxf.io/Vxv09k
🌐 WordPress, WooCommerce & Jetpack
Create professional websites, blogs, and online stores with one of the most trusted web ecosystems in the world.
Ideal for:
✔ Personal Blogs ✔ Portfolio Websites ✔ Business Websites ✔ eCommerce Stores
🔗 https://automattic.pxf.io/Z6vR5W
🌍 Language Learning Resources
🗣️ Preply
Learn English and other languages through personalized one-on-one tutoring sessions with experts from around the world.
🔗 https://preply.sjv.io/o4gBDY
📚 British Council English Online
Improve your professional communication skills and English fluency through structured learning programs.
🔗 https://englishonline.sjv.io/9VOGa4
🧠 Rosetta Stone
One of the most recognized language-learning platforms for immersive language acquisition.
🔗 https://aff.rosettastone.com/X4OyqG
🧪 Science & Educational Resources
🔬 MEL Science
Interactive science kits and educational experiences designed to make STEM learning engaging and practical.
🔗 https://imp.i328067.net/bk2beg
📖 Carson Dellosa Education
Educational materials and learning resources for students, teachers, and lifelong learners.
🔗 https://carsondellosaeducation.sjv.io/E0JbjW
❤️ Support My Work
Creating detailed technical content, tutorials, guides, and learning resources takes significant time and effort.
If you find my articles helpful and would like to support my work, you can do so through the following platforms:
⭐ Become a GitHub Sponsor
Support my open-source contributions, technical content, and community projects.
🔗 https://github.com/sponsors/hritikranjan1
☕ Buy Me a Chai
Enjoying my content? Consider buying me a chai and supporting future tutorials, guides, and educational resources.
🔗 https://www.chai4.me/hritikranjan
👨💻 Connect With Me
Hritik Ranjan
💡 AI Enthusiast ☁️ DevOps Learner 🔐 Cybersecurity Advocate 💻 Software Developer
Connect & Follow
🔗 GitHub: https://github.com/hritikranjan1
🔗 LinkedIn: https://linkedin.com/in/hritikranjan1
📢 Found This Article Helpful?
If this article added value to your learning journey:
✅ Share it with your network ✅ Bookmark it for future reference ✅ Follow for more DevOps, AI, Cloud, Cybersecurity, and Software Engineering content
Thank you for reading and being part of this learning journey.
Keep Learning. Keep Building. Keep Growing. 🚀